
Editor’s note: This blog post was updated on June 27, 2018. Instagram has deprecated much of this API. This widget still works, if you’re showing your own content. Even then, that functionality will be gone in 2020. It’s recommended you look into using the new Instagram Graph API for media consumption.
What is an API? API stands for “application programming interface” but that does not help explain what an API is. The simplest way I could explain what an API is: a way to handle data somewhere other than where you are. A good example that is probably being used on many WordPress websites is a typical Twitter widget. Depending on the widget different API’s may be being used there, and it is displayed in different ways but no matter what way you do it what is happening is your website is using the Twitter API to retrieve and display tweets. However, API does not always mean connecting to an external website and getting data; you could be sending data, or you could even be working with data within your own website. The WordPress settings API is an API for managing your WordPress settings; that is when you are not using CMB!
When working with APIs in PHP you typically see cURL being used to connect to other servers to get or send data. cURL is great, except when the web server does not have cURL installed. So how do you make sure that your plugin or widget that uses APIs will work on as many of the varying server environments across the whole 30% of the internet WordPress powers? WordPress offers you a HTTP API that you can use to access other APIs! Instead of using cURL to send a GET or POST data, we use the wp_remote_get() or wp_remote_post() functions and simply pass in a URL and what data we want to send. I will be using these.
Greg Rickaby, Director of Engineering, and I put our heads together a little while back and extracted an Instagram widget we had created for a client site into its own plugin. This plugin and widget is very simple and will grow later, but it is a perfect proof of concept for accessing an API and then using that data. I will be examining how we went from our goal of using the Instagram API to create a widget that will grab the latest X shared photos, cache them, and then display them. For the purposes of this post, I am going to skip creating the widget itself, but you can check out the source code on our GitHub!
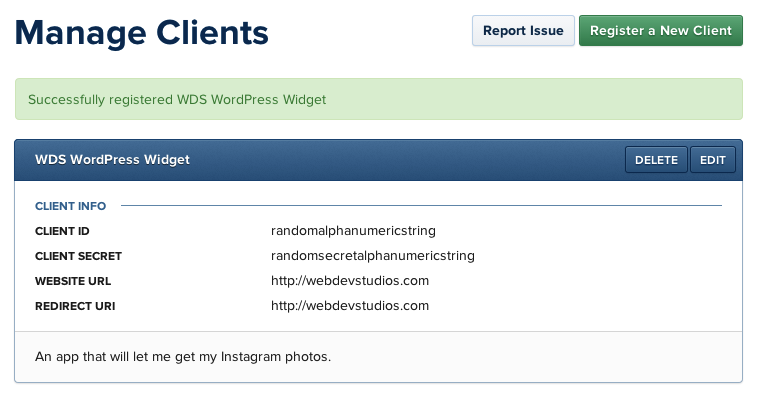
Most APIs require some form of authentication in order to use the API. The same way you need to login to your Instagram account to share your pictures, you need to login to get your data. For our purposes, we will need to create a “client” within Instagram – this is what you will authenticate to the API with. To get the credentials you will need to login to the Instagram developers console and register a client. Where it asks for your website and oAuth redirect URL you can enter your website URL in both fields (we are not dealing with oAuth today but they are required). Once registered you will be given your client ID which we will use to authenticate with the API.

Now that we have our keys to the Instagram API, we can start getting our data! Let’s step through the function below and examine how we can use the WordPress HTTP API to connect to Instagram, authenticate with our new client ID, and cache this response locally for a short period of time to help improve performance and reduce the number of API calls made on every page load.


To cache our data we are going to use the Transients API, and to do this we need a unique key that is no more than 45 characters in length. While this can sometimes at times be a bit difficult to have a readable AND short key I’ve found that having a readable prefix and concatenating that with an MD5 hash of some unique data will give me a unique and short key, every time. When this key is passed into get_transient() if cached data is available it will be returned, otherwise it will return false. If cached data is available skip all the processing and just return it! This will help keep your site running as quick as it can.
$key = 'wds_instagram_widget_' . md5( $this->id, $args['count'] );
if ( false === ( $instagrams = get_transient( $key ) ) ) {
// ...
}
When results are not cached yet though, we need to make that API call. To do this we build the URL that we need to access, which in this case required passing the Instagram user ID (not the username, the integer ID) along with a two query args for the client ID we create earlier and the count of how many photos we want returned. Once the URL has been created, we pass it to wp_remote_get() wrapped in the add_query_arg() function to add the data we need to pass along. Every HTTP request made is going to return a status code with its response in the header, a good quick way to make sure that you are getting the response you expect is to check this code. Typically a good response is going to return a 200, if we do not receive a 200 code (using the wp_remote_retrieve_response_code() function to check the response) from this endpoint of the Instagram API something did not go quite right and we are just going to bail out right now by returning false.
$api_url = 'https://api.instagram.com/v1/users/' . esc_html( $user_id ) . '/media/recent/';
$response = wp_remote_get( add_query_arg( array(
    'client_id' => esc_html( $client_id ),
    'count'     => absint( $count )
), $api_url ) );

// Is the API up?
if ( ! 200 == wp_remote_retrieve_response_code( $response ) ) {
    return false;
}
If you were to access that URL directly once built you would see a nice blob of machine readable JSON! That JSON may mean nothing to you but once WordPress can get it’s hands around it, json_decode() will turn that JSON into a usable PHP object, or if you pass true as the second argument, you will be returned an array. Just in case the API is acting up, or the user ID is wrong, or a client ID is wrong, or for any other reason if we are not returned an array. If the response is not an array, just like before bail out and return false.
$instagrams = json_decode( wp_remote_retrieve_body( $response ), true );

// Are the results in an array?
if ( ! is_array( $instagrams ) ) {
    return false;
}
Finally, once we have received our data and verified it is what we are expecting as well, we can we can save it to a transient using the key from before and cache so the next site visitor can get their page just a little bit faster.
set_transient( $key, $instagrams, apply_filters( 'wds_instagram_widget_cache_lifetime', 1 * HOUR_IN_SECONDS ) );
Putting it all together when we display our widget we can use this function to query the Instagram API for a users photos. Once we verify we did not return false in those few cases with a simple loop our photos are being displayed.
$instagram = $this->get_instagrams( array(
   'user_id'   => $instance['user_id'],
   'client_id' => $instance['client_id'],
   'count'     => $instance['count'],
) );

// If we have Instagrams
if ( false !== $instagram ) : ?>

   <?php
      // Allow the image resolution to be filtered to use any available image resolutions from Instagram
      // low_resolution, thumbnail, standard_resolution
      $image_res = apply_filters( 'wds_instagram_widget_image_resolution', 'standard_resolution' );

      echo $args['before_widget'];
      echo $args['before_title'] . esc_html( $title ) . $args['after_title'];
   ?>

   <ul class="instagram-widget">

   <?php
      foreach( $instagram['data'] as $key => $image ) {
         echo apply_filters( 'wds_instagram_widget_image_html', sprintf( '<li><a href="%1$s"><img class="instagram-image" src="%2$s" alt="%3$s" title="%3$s" /></a></li>',
            $image['link'],
            $image['images'][ $image_res ]['url'],
            $image['caption']['text']
         ), $image );
      }
   ?>

      <a href="https://instagram.com/<?php echo esc_html( $username ); ?>"><?php printf( __( 'Follow %1$s on Instagram', 'wds-instagram' ), esc_html( $username ) ); ?></a>
   </ul>

<?php endif;
That’s it! You have successfully integrated Instagram into WordPress using their API. Using these basic concepts you can expand to integrate just about anything you want; so long as it has an API.