
Editor’s note: This blog post was updated on June 27, 2018.
Every couple months or so, Google seems to like to shake things up a bit and add some new criteria by which they rank sites. One of the most recent of these shakeups was that your site might now be ranked based on whether it supports https. This led to a massive freak out in which everyone and their mom tried to set up HTTPS on their site. Historically, getting HTTPS working isn’t as easy as all that and I’m sure many of you reading this post were either too intimidated by the process or started and then gave up.
Recently I got HTTPS working on my site(s), and I’m going to share with you how I got it working (for free).
What is HTTPS?
HTTPS is, simply, a secure layer on the HTTP protocol we use to access websites. The ‘S’ stands for secure and indicates that all your information to and from this site will be encrypted. Occasionally you’ll see this: ![]()

Why should I care about HTTPS?
Besides the Google rankings, why should you care about securing your site? First of all, as of Google Chrome 68 (coming July 2018) all websites are REQUIRED to use HTTPS.
If you’re running eCommerce on your site, you have to for secure payments. Maybe you can work around this by using a service or platform that takes the transaction part of the shopping experience off your site (like PayPal), but that can be jarring to the user experience. It also inspires trust in your customers to see a green padlock on your site; they know that they can trust you with their business even if you are sending them off to a third party for the transaction and aren’t storing any personal information locally.
But even if you aren’t selling things on your site you should still care about making your site secure. It was recently discovered that the NSA stores huge amounts of data collected from the normal internet usage of people like you and me. Unencrypted sites means that it’s easy for them to get this data, and any additional information/data sent to or from that unencrypted site. While encrypting your site might not be a foolproof way to prevent the NSA from spying on you, it wouldn’t hurt, and it can at least make it more difficult for them to access your data.


Okay, what do I need to do?
SSL certificates range in cost from $5 to $500 depending on where you get them and what they do. I’m not an expert, so I couldn’t even tell you the difference. In a lot of cases you can just contact your host for a security certificate and let them set it up for you, then change your URLs in WordPress.
But that’s not what I did.
A while ago (in fact, not long after Google’s announcement), Cloudflare announced that they’d be offering free SSL to all Cloudflare users, including those (like me) on their free plans. For those of you not familiar with Cloudflare‘s service: they are a DNS service that, among other things, allows you to manage all your domains through their nameservers. In addition to that, they add some additional security and speed-boosting enhancements like caching when you are using their service.
Instead of getting a whitescreen if your server goes down, your users will get either get a message at the top of the page saying that they are looking at a cached version of the page or a Cloudflare error page that says there’s a problem connecting to the server and no cached version of the page could be found (it’s a bit nicer for your users than an Internal Server Error message on a white page). I’ve loved Cloudflare’s free service for years because I like being able to manage all my domains in one place. Having a third-party service managing my nameservers means, too, that if I switch webhosts, I only have one place to make the adjustment to the nameservers (rather than having to go into different domain registrars to change each one individually).
Since I was already using Cloudflare, using Cloudflare’s Universal SSL was a no-brainer and, in fact, when I tested it out on a whim one day–just by putting an https in front of my domain name–I was shocked to see that it actually worked!
Okay, it didn’t really work. There were parts of the page that were broken and not displaying correctly, but the fact that it displayed anything at all, instead of just an error message saying a secure connection could not be made, gave me hope and sent me on the path to set up SSL on my (multi)site.
(Note: Cloudflare’s SSL free certificates have multiple domains on them, so it’s possible that some of those might not be sites you want your site to associate with, especially if you’re doing this for a business or corporate site. This tutorial is assuming you’re like me, and just want to set this up for personal use. Cloudflare is active on Twitter and you can always contact their support staff if you have specific questions or issues.)
For this particular recipe, you will need the following ingredients:
- An account on Cloudflare. Go get one for free if you don’t have one already.
- A WordPress-powered site. I’ll be using my Multisite as an example.
- (Possibly optional) WordPress HTTPS – a plugin that forces HTTPS links across your site(s).
- (Possibly optional if you want mapped domains) WordPress MU Domain Mapping – This is used to easily map custom domains to specific sites on your Multisite.
I’ll assume you have the first two things–a Cloudflare account and a WordPress install. If you have both those things set up and you just throw an https in front of your domain, you’ll probably get something that looks horrible like this:


This is because, as I mentioned before, there are unencrypted elements on the page. There are iFrames serving unencrypted video files and there’s Stylesheets and Javascript serving from http instead of https. All of these things can lead to something that makes you want to cry and claw your eyes out.
This is where WordPress HTTPS comes in. Basically, what WordPress HTTPS does for you is force it so that anywhere on a page where there is an “http://” it’s replaced by an “https://”. Every javascript, every stylesheet, every link, every everything. This is a lot easier to manage than trying to track down every individual unencrypted element on your page and fixing it individually (which I did see suggested when I was working on this).
On Multisite, you can Network Activate WordPress HTTPS and you’ll get a screen like this in your Network Admin:
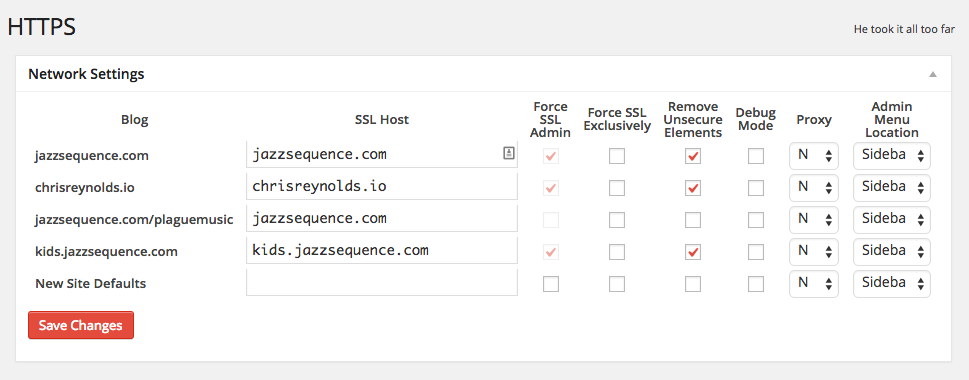

Here I’ve got all the sites on my network listed, along with their SSL hosts (in this case, all my certificates are “self-hosting,” meaning the host is just your regular, root domain), and a couple checkboxes for some global settings.
Specifically, I’m forcing SSL in the admin (this takes the place of the define( 'FORCE_SSL_ADMIN', true ) that you can define in your wp-config.php file–read more about it in the Codex), and I’m removing unsecure elements from the page. This prevents insecure elements from giving you a broken page or a non-green padlock; anything it can’t explicitly fix, it’ll just drop so you can deal with it later and, in the meantime, get your 100% secure site up and running quickly.
If there are some sites on your Multisite that you don’t care or want to be on HTTPS, you can just force SSL in the admin or just leave those unchecked.
In each site’s admin, I have some additional, granular controls over how HTTPS is handled for that site:


You can see here that those same settings from the Network Admin screen, Force SSL Admin and Remove Unsecure Elements, are repeated, and from here, you can override them if you want. It also automatically maps ShareThis and Gravatar URLs to their secure counterparts, and you can use those as boilerplates for mapping your own domains if and when you come across elements that aren’t secure (but could be at a different/altered URL as opposed to just an https:// version of the existing URL). If you really want to get fancy, you can create filters so that certain parts of your site are secured, but other parts are not.
For me, I wanted the whole site to be secure, and these days, there’s no real reason to not just secure everything (especially if you are doing it for Google rankings or because you’re concerned about privacy).
Now, there’s one other part of this and that’s the Domain Mapping component. Otto has an excellent post on WordPress MU Domain Mapping, and covers it far better than I could. If you’re mapping custom domains to your WordPress Multisite, I recommend checking out his post first. The post is a little old but not much has changed since it was written.
Domain Mapping makes it so that on my Multisite, I can edit the full URL of the domain and map it to a specific site ID. I can do this from the normal Multisite Edit Site screen but I also need to do this from the Domain Mapping Domains page. However, if you’re using Domain Mapping, you still can’t edit the http/https part of the URL.


This needs to be done in the Site Settings tab:


That works fine for my subsites, but those fields aren’t editable for my main site.


In this case, you have a couple options:
1) Don’t do SSL on your main site, or just force it on the admin (this might still give you some headaches as WordPress will still be looking for http paths for elements in the admin).
2) Don’t setup Multisite until after you set up your SSL (probably ideal, but not always possible).
3) (╯°□°)╯︵ ┻━┻ give up
4) Hack your database.
As scary as the last option sounds, and as easy as it might be to break stuff, that’s what I’m gonna suggest. As long as you go into it with an understanding that stuff could break and a backup plan if it does (go back and fix things in the DB that you changed or restore a backup), it shouldn’t be that scary.
To do this, first, BACK UP YOUR DATABASE.
Seriously, back it up. In fact, back it up now, while you’re thinking about it.
Now, you’ll need access to phpMyAdmin from your host or the Adminer plugin for WordPress. If you’re more familiar with hacking the WordPress database (like I was), you might know what’s coming already: in your wp_options table, you’re looking for the siteurl and home options. Both of those will have http:// addresses and you just need to change the http to https. Then, go into the wp_sitemeta table and change the siteurl to https there. Again, MAKE SURE YOU BACKUP YOUR DATABASE BEFORE YOU DO THIS! If you used the Adminer plugin to edit your database, delete it once you’re done. There’s no reason to keep it around but there are many reasons to get rid of it.
If everything went smoothly, your Multisite should be all https-ified and you should be looking at a shiny green padlock. Now, if that padlock still isn’t green, you’ll want to open up Google’s Developer Tools (or Safari’s, or Firefox’s) and try to identify what elements on the page aren’t being delivered securely and address those individually.