With all the options available today for sending out newsletters and allowing visitors to subscribe to your content, choosing one can be daunting. MailPoet cuts through all the headaches and makes the pain go away by providing a neat solution that is fully integrated into WordPress and comes with an easy, familiar interface.
Why MailPoet?
MailPoet has some powerful features, including:
- Drag & drop newsletter editor
- Send your latest posts automatically
- Autoresponders, i.e. “Send email 3 days after someone subscribes”
- Send emails to your WordPress users
- Start collecting subscribers in 2-clicks with our sign up widget
- Single or double opt-in, your choice
- Import subscribers in 2 steps
- Get stats for your newsletter: opens, clicks, unsubscribes
- Drag and drop subscription form designer
- Your newsletters look the same in Gmail, iPhone, Android, Outlook, Yahoo, Hotmail, etc.
- Send with your web host, Gmail, any SMTP, like SendGrid, Amazon SES Mandrill, etc…
- Segment your lists based on unopened, opened and clicked
- A beautiful statistics dashboard to compare your newsletters, and subscribers
- Detailed stats for each subscriber and newsletter
- Automated bounce handling, keep your subscribers’ list clean
- Test your spam score before you send a newsletter to your subscribers
- Improve deliverability with DKIM signature
MailPoet has over 200,000 active installs and has been translated into thirty languages!
Hands On With MailPoet
Rather than another comparison with other newsletter providers, let’s get our hands dirty and take a look at how I am leveraging the power of WordPress and MailPoet to automagically send out new content from my wedding website to subscribers. From the installation of MailPoet to having a fully automated newsletter that can be subscribed to was just three steps!
Step 1: Creating a Newsletter
Creating an automatic newsletter for your subscribers is simple.
Visit the MailPoet > Newsletters page and click Create a new email at the top and you will be presented with a form similar to the following. Choose “automatic newsletter,” and set the criteria for when the newsletter should be sent. In this case, I want the newsletter sent when immediately when there is new content. MailPoet allows you to have multiple lists all with different subscribers. Select the list you want and click Next step.

The next page will bring you to a visual newsletter editor where you can drag and drop elements. By default, it will display your latest post as a demo. On the right side of the editor, there are four categories of content types for newsletters:
- Content
- Images
- Styles
- Themes
These categories give you access to:
- Titles & text
- Divider
- Social bookmarks
- Images
- Styling of the various elements such as headers, background, and unsubscribe section
- Newsletter themes
Under the editor is a button that will send you a sample email of what the newsletter will look like to your subscribers.

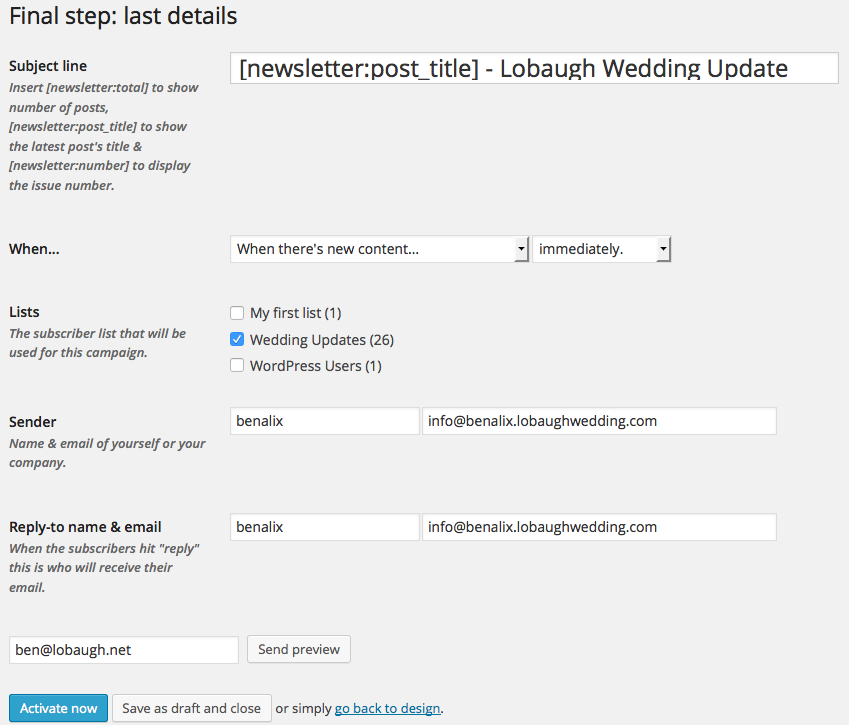
The final page lets you review the basic details of the newsletter, as well as setup the email address subscribers will see when they receive the newsletter. When the info is all correct click the Activate button and subscribers will immediately begin receiving new content.
Step 2: Create the subscription form
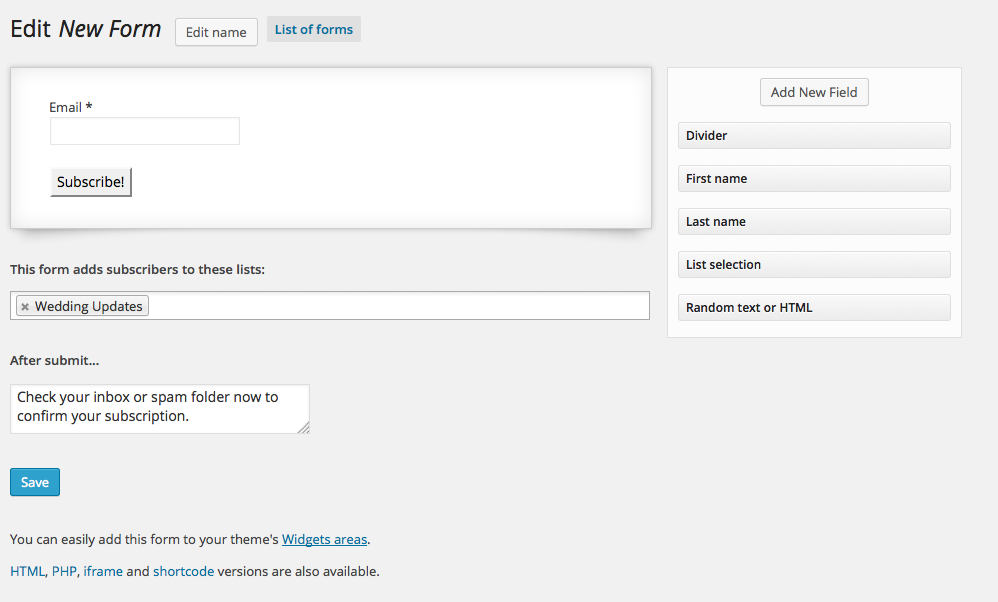
MailPoet allows you to create as many varying subscription forms as you would like. Forms can subscribe the user to a specific list or allow the user to decide which list they would like to subscribe to.
To create a new subscription form visit MailPoet > Settings and click the Forms tab. From here click Create a new form.
By default, the subscription form contains the traditional email address input. It also has options to add:
- Divider
- First name
- Last name
- List selection
- Random text or HTML
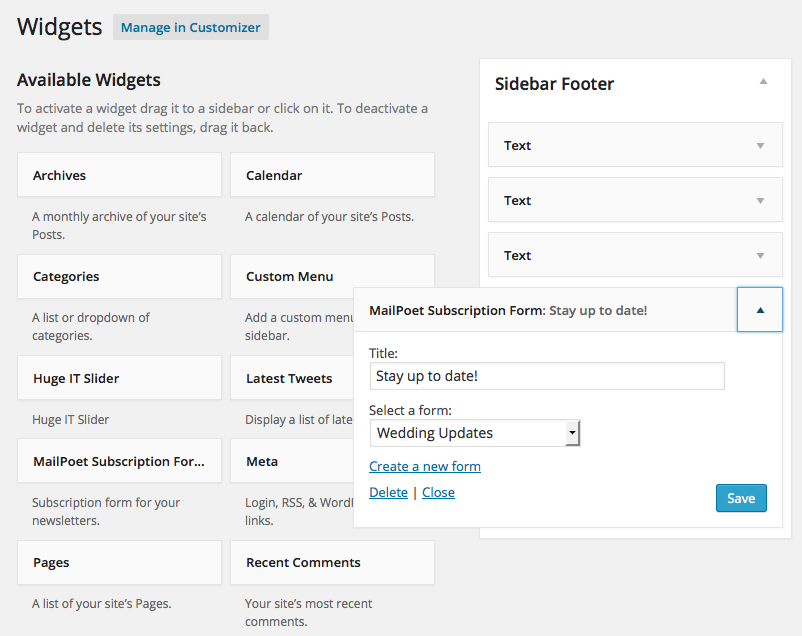
Step 3: Add the widget to your theme
This is the easiest part! Simply navigate to Appearance > Widgets and drag the MailPoet Subscription Form widget to the sidebar where you would like it to appear. Name it and choose the “for,” and presto, automated content subscriptions are now ready to go!
Get ‘Dem Stats
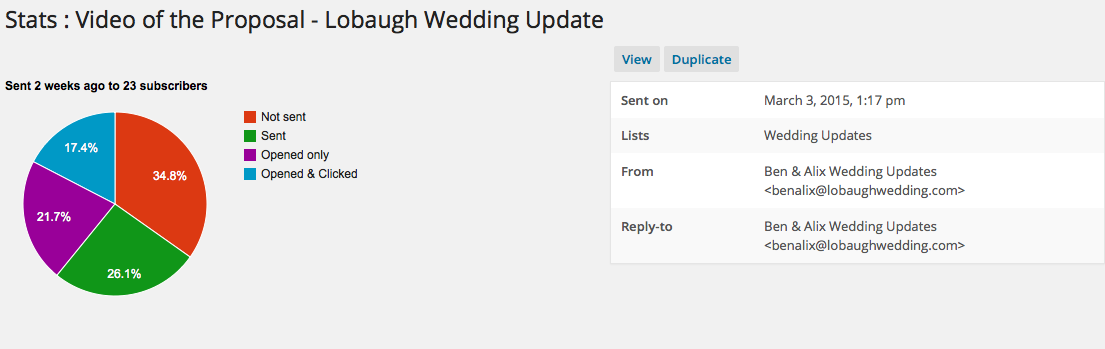
MailPoet has some great statistics built in–similar to what you would expect from a hosted service such as MailChimp. Each newsletter is broken down by number of Opened, Open, and Clicked (link in newsletter), Sent (Not opened), Not Sent (delivery failed). When viewing stats from the newsletter you can see which subscribers opened the newsletter. You can also view an individual subscriber’s profile and see which newsletters they received and which were opened. These stats are all available on the free version of MailPoet. Upgrade to premium and additional stats can be unlocked.
In this post, you have seen how in twenty minutes you can easily setup a powerful newsletter subscription service. This is just one example of the power of MailPoet and what you can accomplish with the plugin. What project have you created that could benefit from these features? Need help setting up MailPoet on your site? Well, you know, we can do that…
I appreciate your sharing this plugin and especially the documentation. Awesome amount of power here! Thanks!
Thank you for sharing tips for MailPoet.