No one likes reading, right? I mean, why are you even reading this sentence instead of surfing YouTube looking at cat videos? As a culture, we often to gravitate toward passive entertainment–information flung at us without us having to do a whole lot of work in the process. More active entertainment, which can describe actual physical activity but can also apply to activities that require you to actually think, is harder. Reading long blog posts is hard, playing soccer is hard, learning to ride a bike is hard. Listening to some talking head on the radio is easy, but actually discussing what they were talking about with a colleague might require you to consider not only what was said, but how you feel about it, which is harder.
These “hard” activities are ultimately more rewarding than any kind of passive activity. Talking about things with other people (or writing about them) is an active activity that reinforces your own ideas on the subject (or helps you to consider new ideas). You might learn a lot about tactics and formations and how soccer is played by sitting in front of your XBox and playing FIFA, but it doesn’t make you a better soccer player until you actually go out and use your body. You learn some interesting new fact or information that you can use in the future, you develop muscles or skills you didn’t have, you engage with a compelling story, all are results of active activities.
One of the things that I do when I’m not writing code is produce training videos for a company called Pluralsight. Pluralsight specializes in online IT pro and developer training and has a library of thousands of videos. I’ve been doing this for about three years, so everything I’m going to talk about here comes out of things I’ve learned along the way through trial and error, user feedback, and conversations with other Pluralsight authors.
Generally speaking, screencasts (and many other educational video formats) are a form of active entertainment disguising itself as passive entertainment. You’re sucked in because they are often short (faster than reading the source material, anyway) and presented in a compelling way meaning that completely by accident you end up learning something. Studies have proven that when you’re engaged or particularly interested in the content, you end up learning more, for example Minecraft leading to better literacy skills in kids. If you’re writing a lot of documentation or content, using video might be a way to make that content more digestible to a larger audience.
Video is also extremely searchable. It’s been known for quite a while among those in the SEO and SEM fields that videos on YouTube are indexed by Google almost instantaneously, making them show up in search results much faster than blog content. When you upload a video to YouTube, you’re entering it directly into Google’s infrastructure, so of course it’s going to be able to add that content to search results faster than it would take one of their crawlers to find your site, even if you’re pinging Google when you publish new content.
Getting started
So, you’ve decided to start producing video content. Great. How do you start?
Probably the first thing you need to figure out is where your videos are going to live. All of my Pluralsight courses get submitted to Pluralsight, so I hand them the raw mp4 files and they add them to the library manually. Probably you won’t be doing something like that, although it’s worth noting that, with platforms like WooThemes’ Sensei and LearnDash, if you wanted to, you could create your own learning library.
Assuming you don’t want to manage the unruly task of dealing with supporting different video file formats for different browsers (including mobile) and the generally large video files you’ll be creating, you’ll want to have a platform for hosting your videos that doesn’t care about size, that provides an easy to use embed code, that takes care of optimizing at different resolutions and video qualities…if only there was some sort of free video hosting service that was ubiquitous and easy to use…
Oh wait, there is! YouTube is the obvious choice here. You can create public or private videos, you can even livestream your screencasts if you want. But it’s not the only choice. Screencast.com is another service that integrates natively with a couple of the tools I’m going to talk about for creating your screencasts. You get limited storage (2GB) but you can upgrade to the Pro account for more space. What does it give you that YouTube doesn’t? Not a whole lot, but it’s the only option you get for sharing if you’re using the screen capturing software Jing, which I’ll talk about next.
There isn’t much out there in the world of screen capturing software that’s both free and good. One app that fits both those criteria is Jing. Jing is a free, cross-platform app that is designed for really quick screen shares. Like “hey, I just found this thing and I want to show you how to do it.” It adds a little yellow bubble at the top of your screen that you can hover over to give you the ability to take a screenshot or a video of your desktop. When you’re done recording, your video gets uploaded automatically to Screencast.com and you get a shortlink. There’s also an embed code available if you go to Screencast.com.
It’s simple and quick and easy, but it’s not the thing for more lengthy videos and you never get a copy of the video itself. If you’re on a Mac, you can actually use Quicktime to record your screen. You have less control over the file format than in more sophisticated video capturing and editing applications and there’s no built-in editing controls, but you at least get a file that you can edit later (if you have a video editing program) and upload to YouTube or wherever you’re hosting video. The biggest benefit here is that, if you have a Mac, you don’t need to do anything at all; you already have Quicktime and it will already record your screen.
Of the paid solutions, two programs float to the top: ScreenFlow (Mac-only) and Camtasia (Windows or Mac). Both are almost identical in terms of features. The Mac version of Camtasia and Screenflow are even the same price (the Windows version is significantly more pricey). What you’ll notice about Camtasia is that it’s made by TechSmith, the same folks who made Jing and created Screencast.com. These guys have been doing this for a long time and Camtasia has kind of been the de facto standard. ScreenFlow is a bit newer and gets a lot of love from the folks I know who use it. I’ve tried it, but I’ve always been a Camtasia user and, even though the Mac version is significantly different than the Windows version (which has many more features and control), that’s what I use.
There are professional video editing suites, of course. Adobe Premier, Final Cut Pro, Sony Vegas–all of these are fantastic for editing video…if you know what you’re doing. Video editing isn’t exactly something that can be learned overnight. Camtasia and ScreenFlow, on the other hand, offer the right balance of control without overwhelming you with options or requiring a lot of experience with video editing.
Types of screencasts
I would identify four basic categories that most screencasts fall into:
- Promotional
- “Show me”
- “Tell me”
- Lesson
The kinds of screencasts that I do, for example, fall into the last two categories.
Promotional screencasts
You’ve probably seen these before. You’re on a site about a new product or WordPress plugin and there’s a video with a peppy soundtrack, no words, and a rapid-fire video walkthrough of the features. WPMUDev uses this technique a lot for many of their plugins.
These videos will probably have a lot of effects and transitions, and there’s an obvious need for on-screen text (since there’s no words), but there will be very little in the way of showing you how to actually do anything. It’s more about showing you what’s possible and teasing the functionality so you’re interested in learning more. Promotional screencasts can have narration, of course, but usually it’s more of “this is what our product can do for you” than “this is how to perform this specific task.”
“Show me” vs “Tell me” screencasts
The next two categories are really similar. There’s the “show me” screencasts, where the video shows how you do something and explains what’s going on in the video through callouts or on-screen text but has no audio narration, and the “tell me” variation, where you get both audio and video explaining how to do something.
Here’s a video that’s trying to “show me” how to do something:
…and here’s an example of a “tell me” video:
I’m not going to say that one or the other of these is necessarily better because it comes down to a couple factors, some of which may be beyond your control. First, there’s audio quality–if you don’t have a quiet place to record or a decent microphone, you’ll end up with sub-par recordings that don’t feel professional. It’s much better, in that case, to just find some royalty-free music to use as a soundtrack and add some on-screen text. It’s also possible that you just don’t like the sound of your voice and are nervous about putting it out there. That’s fine, too. In that case, the “show me” variety is probably better.
But adding a human narration can better communicate to your viewers. Combining narration with a demo or screenshots in your video will give them a better grasp of the concepts you’re explaining and a human voice is immediately more compelling than a catchy soundtrack, even if (and possibly especially when) you make mistakes.
Lesson screencasts
The last category, what I would refer to as “lessons,” are longer-form tutorials that incorporate narration, demos and screencaptures and often slides. These are designed to teach you how to do something. They can often be dry, so coloring the video with transitions or interesting graphics or visuals or spicing up the narration using jokes or compelling stories can help to keep your viewers’ interest up. Here’s an example by Atlassian about their project management system, Jira:
I don’t expect you to watch the whole video (unless you really want to learn about Jira). But there are a few things you can get out of it just by watching the first couple minutes and/or skimming through. It’s long, and at just under 25 minutes, it’s a lot longer than any of the other examples I’ve shown. And that makes sense because Jira is a complex system and this is a video to help you understand how to make the most of it. It combines slides, creating an introduction at the beginning to set the viewers’ expectations going into the video, and recordings of the actual interface. There’s a soundtrack under the narration, too, which is probably there to make the audio track seem less sparse. They highlight areas of the screen at different times when displaying the interface to draw your attention to those areas. This can be a powerful and valuable tool for communicating your ideas, especially if you’re demoing a product or code.
Preparing your environment
Before you start recording your screen (or a portion of your screen, like a browser window), do some housekeeping. If your desktop is going to be visible, clear your desktop of unnecessary icons or shortcuts. The more stuff on your screen there is, the more likely your audience is to be distracted by your stuff and pay less attention to what you’re trying to tell them (this is something that is true for me, personally: “Oh, hey, I have that plugin, too…”). Choose a fairly inoffensive (or possibly branded) wallpaper to set your desktop background to and disable all notifications; you don’t want windows popping up when you’re trying to record something on your screen. If your screencast is going to be in a browser window, hide unnecessary toolbars and extensions or plugins and themes; make it look as generic as possible. Maybe keep around a browser that you never use just for the purpose of doing your screencasts, create a separate browser user profile or record in an Incognito window. Again, you don’t want your audience to be distracted by your stuff.
If you’re demoing in a browser or an IDE, increase the font size. This is hugely important. I even look back on videos I made a few years ago and cringe because I can’t read the text on the screen. Understand that your viewers might not be watching your video full screen. Their screen might not be a monitor–it could be a tablet or a phone. You don’t need to go completely nuts with font size, but definitely increase the font size to something considerably larger than what you would normally use.
And, along with that, if you have a huge monitor with a ridiculously high desktop resolution, don’t record full screen. Just don’t. You want to record your screen at or close to the resolution of the final video that you’ll be producing. Currently, the best-possible resolution for video is 1080p or 1920×1080, and that will produce a pretty big file. I recommend recording at or around 720p which is 1280×720. It might feel like you’re back in 2005 making your resolution so big, but 720p is still considered HD video and the quality it produces will look good on pretty much everything except retina screens. I use my laptop (a 13″ Macbook Pro) with an external monitor and when I’m recording, I’ll use my laptop screen to do the screen recordings (which has a maximum resolution of 1280×800).
Often it’s better to just avoid recording the entire screen at all. If most of your work is going to be in an IDE, record just the IDE–we don’t need to see the desktop. If you’re demoing a site in a browser window, just record the browser window. There are apps and browser plugins that you can download (many of which are free) that can resize your windows for you so you can make sure that you set it to the correct dimensions before recording and then just record that window in your editing software.
Finally, one thing that I see a lot in screencasts is unnecessary mouse movements or dragging to highlight text. Don’t do this. Moving your mouse around the screen is incredibly distracting. If your cursor doesn’t need to be visible (because you are just showing a screen or a piece of code but not actively clicking or performing an action with the mouse), then hide it or make it invisible in your editor. Don’t bob your cursor around in a circle to get your viewers to look at a particular place on the screen; use highlighting callouts or effects in post-production when you’re done recording. Don’t highlight a block of text to get people to read or notice it, use effects to circle it or darken the rest of the screen to make it more obvious what you want them to look at. Zooming into a particular part of the screen that you want to call attention to can be a good technique, but it might be better to do a crossfade transition to the screen recording already zoomed in rather than actually using a zoom to avoid making your viewers dizzy from zooming in and out (this was one of the biggest complaints I’ve heard about many presentations made using Prezi).
Recording your screencast
Now you’re ready to start recording. Make sure that, if you’re recording audio, you’re doing so in a quiet room. Soundproofing is great, if possible, but there are ways of making really high quality audio recordings without having to do elaborate soundproofing which I’ll talk about in a bit. Above all, make sure that you won’t be interrupted for a couple hours while you’re doing your recording. Even if you aren’t recording the audio live, you’ll want a solid chunk of time where you can be without distractions so you can focus on recording your screencast.
Don’t be afraid to make mistakes. They will happen and no screencast will be perfect. Any mistakes you do make can always be edited out in post-production. It’s often helpful, especially when recording audio, to clap or snap or make some sort of sound to indicate where the edit needs to be made and where you’re starting from again.
When presenting code, there are a couple different schools of thought in terms of how to show that in a screencast. The first is recording the live coding. For me, this is impossible to do if I’m recording the audio live and really difficult to sync the audio to the video and time it correctly (without speeding up the typing to an insane degree) if I’m recording the audio separate from the video, but a lot of people do this and do it well. Live coding and explaining what you’re doing as you’re coding feels like you’re looking over the developer’s shoulder and watching them work. It’s possible that you’ll make mistakes or typos in your code as you do this; as long as you can recover from it and correct yourself, you can use that as a teaching moment and a way to connect to your viewer (as if to say “See? Even I make mistakes sometimes.”). If you get hung up on a bug or a problem or you add code that is actually incorrect and would create bugs in the software, you’ll want to make sure to edit those out and re-record.
Another way of showing code is to display the IDE but hide all but the code that you’re currently talking about, and reveal chunks of code as you get to them (or otherwise use effects to highlight just the sections of code you’re describing). This way, you see the code in the context of the rest of the software but you aren’t trying to keep up with the text flying across the screen (or frustrated by how slow the text is moving across the screen if you want to skip to a later part of the function).
Finally, what I often do is just put the code on a slide. This is more for specific chunks of code–a specific function I’m using that I want to talk about (as opposed to a complete function that I’m writing) or an example of some arguments that I want to pass to a function or object like WP_Query. This is a good way to focus on a particular, small piece of code, make it big and readable and then talk about how it works.
If you’re using slides…
A lot of the videos that I make are heavily slide-based. When I first started doing these, the recommendation I got was to record all my audio live, go into present mode in PowerPoint or Keynote, and record the video of me doing the presentation manually. Later, I learned that you can export your slides to images from PowerPoint or Keynote (or Open Office Impress), and then import those images into Camtasia (or whatever you’re using) and this is what I do now. The upside is that you can record your audio and video separately (which is how I do it) and time the slides with the audio by extending or decreasing the amount of time they are displayed. On the downside, if you need to make changes to any of the slides, you’ll often need to re-export the whole batch or at least the slide(s) that you’ve edited.
The other downside of using images is you lose any cool transitions you may have added inside your presentation software. However, Keynote (and, though I haven’t used it recently, I’m assuming PowerPoint also) allows you to also export your presentation to a video file. Though it doesn’t let you only export a certain group of slides (you’ll have to edit the video file manually), it at least gives you something to work with so you can keep any transitions you added to your presentation.
Recording Audio
Optimal audio recording for voice is a huge topic, one that probably deserves its own post. What I can say briefly is that while it is highly complicated it also matters a lot. Though there don’t seem to be any analytics supporting the idea that a video with poor audio quality will cause a viewer to abandon the video and look for something else (at least from what I know within Pluralsight), for me, personally, it immediately makes me less interested in the video and tells me that this is not a professional quality video. Again, if you don’t have a good environment or setup, you might be better off just using some music and on-screen text. But it doesn’t take much to learn how to produce a video with decent-sounding audio.
Your biggest enemy is ambient noise. All microphones are going to pick up a lot of background noise and the really good ones will probably pick up even more. This is why everyone goes on and on about the importance of soundproofing. I live in a 100+ year old house with brick walls that faces a main thoroughfare; soundproofing isn’t really an option for me unless I converted one of our existing rooms into a recording studio. I’ve had to learn how best to produce good quality audio without investing a ton of money renovating this old house.
One key factor is getting a good microphone. It can’t be overstated how important this is. Those chintzy headphone/microphones you use for Skype aren’t good enough. The audio quality will sound hollow and unnatural and like you’re talking through a paper cup. The first step to recording good audio for your video is having a good microphone. But what’s a good microphone? That’s a more difficult question, right? Because it’s not like you can just go out and try a hundred different microphones and see what they sound like (though if you ever do have an opportunity to test out a bunch of different fancy microphones, I highly recommend it to know what’s good). I’m going to include some Amazon links to things so you can go out and purchase these for yourself or just check them out and read the reviews. None of these links are affiliate links or paid endorsements; they are just things that I’ve either used or would recommend based on direct feedback from people who do use them.
I use a Rode Podcaster, and I’ve also used a Blue Snowball, which is about 1/4 the price and was able to produce decent-sounding audio. Another option is the Blue Yeti which is also a little less expensive than the Rode mics. A key thing to look for is a microphone that is unidirectional. These microphones might also be referred to as “cardiod” microphones. What this means is that they pick up less background noise by focussing the pickup area to one direction, usually in front of the microphone, as opposed to omnidirectional mics that are good at picking up the whole room.
The Blue Snowball, for example, has a switch on the back so you can toggle it between unidirectional and omnidirectional. The Rode Podcaster stands out particularly in its sound quality for the price you pay; it’s a professional-quality broadcasting microphone that doesn’t cost an arm and a leg and it’s worth every penny. There’s also a Procaster, which is the next step up and designed for professional broadcasting, but I haven’t heard a lot of compelling reasons from other users of it why a Procaster would be that much better than a Podcaster. All the microphones I’ve named are USB and cross-platform (except the Procaster which has an XLR interface), so you don’t need to worry about getting any new hardware to use them, just plug them in and go.
Once you have a microphone, though, you’ll probably need somewhere to put it. Some mics come with little stands but most do not, meaning you’ve got a mic, but no place to put it (unless you’re going to hold it in your hand while you record…important note: don’t do this!). I can’t recommend the Rode boom arm enough. I love it so much I wrote an Amazon review for it after I got it. The boom can greatly improve the sound quality of your recording by reducing your signal-to-noise ratio. In layman’s terms, allowing the microphone to pick up more of what you want to record (by getting it closer to the thing producing the sound you’re recording, namely, your mouth) and less of what you don’t want to record (all your room and ambient noise).
A couple other things that are worth considering are a shock mount and a pop filter. Pop filters are cheap (the one I have can be found for ten bucks) and you can make them yourself with a wire hanger and a ripped up sock (that is, if you want a wire hanger and a ripped up sock in front of your face when you’re recording). What pop filters do is reduce the explosive nature of words with “p” or “b” in them, where there’s a sudden burst of air coming out of your mouth. That burst of air goes right into the microphone and hits the recording surface and sounds like a small explosion.
Some microphones (like the Rode) have a kind of built-in pop filter that will reduce this impact somewhat, but even so, I’ve been recommended by audio producers who do this for a living that it’s still better to use a pop filter if you are going to be speaking directly into the microphone (my microphone is angled slightly away from my mouth, so I’m speaking next to it but not exactly into it, and I was told that this was okay).
A shock mount is useful if you’re moving the boom around a lot or typing while you’re recording. Basically, imagine a cage of rubber bands. Your microphone is connected to these rubber bands instead of your mic stand or boom. Any impact caused by bumps to the surface that the mic stand or boom is mounted to will vibrate up the arm but get absorbed by the rubber bands so they aren’t picked up by the microphone. That’s what a shock mount does. It’s most helpful if you’re recording your audio and video live and doing live coding or work on the keyboard and will help to reduce the feeling like you’re slamming on your keyboard like a maniac.
One important part of recording audio that can’t be corrected by getting good equipment is pace. I was in theatre in high school. We spent long rehearsals being told to slow down. Even so, many of my recordings sound like my mouth has been replaced by a motorboat I’m talking so fast. There’s no rush, and the slower you talk, the more understandable you become. This will feel completely unnatural to you. If you’re like me, you’ll find yourself falling back into your normal pattern of speech and talking fast again. Try to resist this as much as possible. Know that not only are you making yourself more understandable by people who speak the same language as you naturally, but by slowing down your pace, you’re making yourself more understandable to people who may not be native speakers of your language.
As I mentioned before, I record my audio separate from my video. I started off trying to do them at the same time, but I ended up with a lot of pauses and “ums” in my recordings. Instead, I write a script for my audio and I try to make it as conversational as possible. This is kind of a big deal because you can tell, as a listener, when someone is reading from a script versus talking off the cuff. It’s okay to sound somewhat rehearsed, but try to keep your voice as natural as possible and try not to make it sound like you’re just reading if you go this route. Scripting first means I can take more time to figure out what I’m going to say and how I’m going to say it, it helps to reduce “ums” and “uhs” and, for me at least, makes the recording flow more.
It’s not without a cost, however. No matter how hard I try, scripted audio always sounds scripted. It might sound less scripted, but since that’s what I do, I’ve noticed when podcasts or other recordings are scripted as opposed to being recorded live and on-the-fly. It takes a lot of skill and practice to make this work well, but it’s possible and can be done really well.
The other reason I record the audio separately, though, is so I can ultimately improve the quality of the audio before adding the video to it. While you can use ScreenFlow or Camtasia or some other video editing suite to record your audio, they’re going to have fewer controls and settings for recording audio–that’s not really what they are good at. So the first thing is to identify an audio recording application or a Digital Audio Workstation (DAW) to use and there are a million things out there.
I use Ableton because I started using that several years ago for making music and sort of stuck with it. You don’t need to use something this fancy, but if you are an Ableton user, you can download the Ableton rack I built for vocal processing. There’s also Reaper, which is a freemium DAW or you can download Audacity, a free, cross-platform audio editing program. I haven’t tried it, but you could probably also work inside GarageBand, which is free with a newer Mac, as I’m sure there are audio processing plugins built-in that would have the same effects I’m going to go over. I’ll explain what my Ableton voice processing rack does so even if you aren’t using Ableton, you can at least get an idea of how to do something similar in your audio processing application of choice.
The first thing to know about is compression. There’s a great Gist available that I highly recommend to anyone interested in doing anything involving voice recording about compression and how to use it for voice. This guide does a great job of explaining what compression is, how it works, and why it’s good to use in voiceover. Basically, what compression does is normalize the audio signal so there’s less of a difference between the loudest parts of the signal and the quietest parts. This is good for voice recordings in particular because you want a consistent volume and sound quality throughout your recording. You don’t want some parts of your recording to be quieter or louder than other parts.
This guide also defines some important audio terminology which will help with understanding what the various effects and plugins and processing effects in these audio editing applications actually do. So the first thing that I did with my audio processing rack was follow that guide to figure out what a good compression level was for my voice based on how I normally record. With the exception of when I’ve moved my workstation to different parts of the house, it’s been pretty much “set it and forget it”. I highly recommend going through his compressing for voiceover section to get these settings right. His base compression settings look like this:
- Threshold: -26db
- Ratio: 3:1
- Attack: 1ms
- Release: 10ms
- Output: +6dB
Mine, on contrast, are somewhere around this:
- Threshold: -28.7db
- Ratio: 2:1
- Attack: 2.19ms
- Release: 15.4ms
- Output: +3.63dB
Again, this is going to be pretty highly individualized to your environment and speaking voice. Use these settings as a guide and adjust accordingly.
Compression alone is great for improving the overall sound of your voice and giving it a heavier sound, but it won’t eliminate all the background noise (it might reduce it some). There are a variety of ways of dealing with background noise. One is through noise cancellation. How this works is you record your room with nothing going on to get a sort of base-level of what the room noise sounds like. A noise cancellation plugin or processor will take that sample and remove everything that sounds like that from the final recording. This can work great if your noise floor (basically your unwanted background noise) is fairly minimal. But if your ambient noise is dominant, using noise cancellation can make the final product sound over-processed–with little digital artifacts left behind, making the recording sound robotic and unnatural.
I don’t use noise cancellation though I’ve tried it briefly. I’ve had better results using a combination of compression and gating. The Wikipedia entry explains this concept pretty well: A “gate” or “noise gate” will “duck” the recording when there’s no signal.
Comparable to a compressor, which attenuate signals above a threshold, noise gates attenuate signals that register below the threshold. However, noise gates attenuate signals by a fixed amount, known as the range. In its most simple form, a noise gate allows a signal to pass through only when it is above a set threshold: the gate is ‘open’. If the signal falls below the threshold no signal is allowed to pass (or the signal is substantially attenuated): the gate is ‘closed’. A noise gate is used when the level of the ‘signal’ is above the level of the ‘noise’. The threshold is set above the level of the ‘noise’ and so when there is no ‘signal’ the gate is closed. A noise gate does not remove noise from the signal. When the gate is open both the signal and the noise will pass through.
Basically, it works as if someone was sitting there and dropping the volume of the mic to zero when you weren’t talking. Noise gates are great but you have to be careful when setting them up. Too much gating, and your recording will get chopped up. Too little and it doesn’t do anything. Ducking (dropping the signal volume) too quickly will sound unnatural, too slowly and you’ll pick up more background noise. Like with compression, you’ll need to play with it to get it right. The way to start is by lowering the threshold down to the point where your words are no longer being chopped off. You’ll want to use a fairly short attack (how quickly the gate kicks in) and you’ll want to adjust the release (how quickly the gate effect ends) according to your preferences. The attack on my gate is 0.02ms and the release is 50.9ms — this means that it will open quickly when there is a signal coming in, and close slowly to create a more natural-sounding recording.
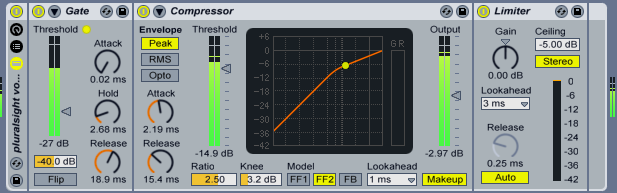
This is what my Ableton voice processing rack looks like:
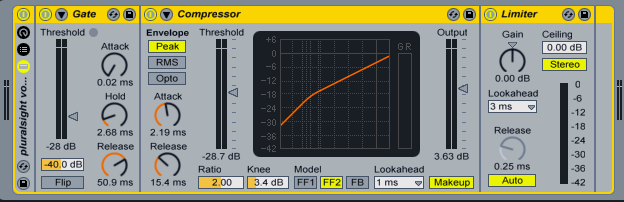
The last component of the rack on the right is a Limiter. This takes the signal and if it is over a certain threshold, it will trim it to prevent distortion or clipping. Most of the time, especially if you have control in the compressor to add or reduce the gain (volume) on the output, you won’t need the limiter, but there are always spikes in the signal so this is there as a sort of safeguard.
Here’s what the difference sounds like. The first audio clip is one I recorded without any processing effects added. The second is with gating, compression and limiting, with some of the specific settings tweaked a bit from those shown above.
Before:
After:
Hopefully there’s enough of a difference there that you can sort of tell what’s going on. If not, you might try putting on a pair of headphones. The room I record in these days is pretty quiet and probably I could get away with just using the unedited audio (on a good day with no cars going by). You might notice some natural reverb in both recordings. If you really wanted to get rid of this, that’s what soundproofing is for. Personally, I don’t think that some amount of room noise is bad as long as it doesn’t sound like you’re in a tunnel. And there are ways to naturally soundproof your room without going crazy–putting up screens around your recording area and covering them with blankets is a cheap and easy way or even recording in a closet full of clothes which is done by a lot of voiceover actors and vocalists. If you’re curious, here’s what the settings on my rack looked like to produce the second recording:
Putting it all together
My workflow (which you can read about on my blog) is generally to write an outline first, then script the whole thing, then record (and edit) the audio, then create the slides and, finally, produce the video, including recording screencasts as I’m doing the video editing. I make sure that any mistakes are edited out of the audio files and they are in as final a state as possible before starting on the video. That way I know I don’t need to worry about editing those parts out when I’m doing the video editing.
One thing that could help if you are producing video tutorials is being wary of the time. Long videos (longer than six minutes) often don’t perform as well as shorter videos and many times people will use videos to answer a specific question they have. If it’s feasible, break up your content into small, focussed chunks, so if I was looking for the answer to a specific question, I could watch your video and get the solution in two to three minutes. Don’t spend a lot of time talking about the thing you’re going to talk about or giving an elaborate introduction. (“In this video, I’m going to talk about how to build an underwater basket weaving business with less than $25…we’re going to talk about the underwater basket weaving industry, it’s long and illustrious history, many notable underwater basket weavers of the past, and what underwater basket weaving means to our society…then we’re going to talk about…”)
Many of the videos that I watch will do a lot of setup that I don’t care about, and not actually get into the thing that I want to know about until the second minute or so. Introduce yourself, give a brief introduction or slide telling the audience what you’re going to talk about, and then just launch into the content, unless you need to provide context that I need to know in order to understand what you’re teaching me.
Producing really good video content is not easy and it’s incredibly time-consuming, but it can be a much more effective way of communicating than documentation alone. With videos, little details matter a lot and might be the difference between someone sticking out a long video tutorial, or closing the tab and moving on. Even if your videos aren’t as complex, involved or detailed as the ones that I generally produce (which have multiple parts and are usually one to two hours or more), it’s good to at least think about the best possible way to present your content and make sure that what you are producing is something that would be engaging to you.
Really awesome post.
I already apply some of these advices, but there are lot of good tips I haven’t think of yet.
Thank you for taking the time to write this post.
Thank you for taking the time to read it. 🙂
I was looking for information on making my voice sound more consistent between several different types of recordings (screencast, video of demonstration and video of me talking) and this was very helpful– thank you.
Thanks for taking the time for making this tutorial, really appreciated. I always create screencast with a web-based software calls Acethinker Online Screen Recorder, It’s a free web-based application to record computer screen right from the browser, you don’t have to download or install anything. Share it here as an alternative method.