Do you like saving time (and money)? Are you exhausted by constant interruptions and barriers when trying to ship, because of internal feuds about code syntax? Are you 100% confident that your app will work across different PHP versions and devices?
If not, then using code linters on your next project can help ensure developers are solving problems — instead of worrying about code syntax. As an added benefit, linters and code style guides will also enable developers jump in and out of projects quickly, because the environment is familiar. As Brad Frost pointed out in his book Atomic Design:
These (code style) guidelines and guardrails help rein in the madness so that teams can focus on producing great work together rather than refactoring a bunch of sloppy, inconsistent code.
WebDevStudios (WDS) uses linters and code style guides on every project. All of our developers are required to use the following apps: PHPCS, ESLint, and Sass Lint. This allows us to concentrate on solving problems – instead of worrying about if they should uses tabs or spaces. (Definitely tabs.)
In this blog post, which is highly technical in nature (and so ridiculously long, I even built a Table of Contents), I will outline the steps necessary to install and set up your local development machine to lint and report its findings about your code quality. If watching screencasts are more your speed, I’ve created a series of YouTube videos based on this blog post!
Last update: January 18, 2019

Prerequisites
Because this blog post will be dealing with the command line, I must assume you know how to use it. Before you can get started with any linting, you must have the following dependencies installed:
- PHP (available from the command line)
- Composer
- Node and NPM
- Git
- Powershell (for Windows users)
Don’t fret. Chances are that you might already have these installed. If you’re not sure, below is a quick command to help you check:
On macOS/Linux, you can paste the following into Terminal and press Enter:
$ which php composer node npm git
On Windows, you can paste the following into PowerShell and press Enter:
$ where.exe php composer node npm git
If you see a path (for each dependency) after that command runs (like below), then you’re good to proceed to the next step. If you don’t see items, then review each respective dependencies documentation for installation instructions (which could be a blog post on it’s own!).
/usr/local/bin/php
/usr/local/bin/composer
/usr/local/bin/node
/usr/local/bin/npm
/usr/local/bin/git
Introductions
Before I jump into it, let me go over some some basics.
So just what is linting? The process of reviewing code for stylistic and syntax errors.
And what is a linter? A linter checks your code (either automatically in a code editor or manually via the command line) and compares it against a set of rules (known as a ruleset), and then reports its findings back to the user.
A quick introduction to PHPCS
PHPCS stands for PHP Code Sniffer and according to Squizlabs on Github:
PHP_CodeSniffer is a set of two PHP scripts; the main phpcs script that tokenizes PHP, JavaScript and CSS files to detect violations of a defined coding standard, and a second phpcbf script to automatically correct coding standard violations. PHP_CodeSniffer is an essential development tool that ensures your code remains clean and consistent.
Basically, PHPCS has the ability to sniff and automatically fix minor PHP errors with PHPCBF (PHP Code Beautifier). PHPCS can be run from either the command line or in your code editor/IDE. It requires no configuration file to start, but you can add config files (as plugins – like WPCS) and even create a custom ruleset. More on this later.
A quick introduction to the WordPress Code Standards
PHPCS comes bundled with some default rulesets to help you sniff out stylistic and code quality issues. However, if you’re developing with WordPress, then it’s a good idea to use and follow the WordPress Code Standards. There are five possible rulesets to choose from when setting up PHPCS:
- WordPress – A complete set with all of the sniffs in the project. Includes Core, Docs, Extra, and VIP.
- WordPress-Core – The main ruleset for WordPress core coding standards.
- WordPress-Docs – Additional ruleset for WordPress inline documentation standards.
- WordPress-Extra – Extended ruleset for recommended best practices; not sufficiently covered in the WordPress core coding standards. Includes WordPress-Core. (This is the WDS default.)
- WordPress-VIP – Extended ruleset for WordPress VIP coding requirements. Includes WordPress-Core.
Learn more about the rulesets on Github.
A quick introduction to ESLint
There are three major JavaScript linters:
- JSLint – the original JavaScript linter written back in 2002.
- JSHint – a fork of JSLint, which is a bit more extendable.
- ESLint – slower than the other two, but has greater ES6 coverage and is extremely extendable. Is very popular and becoming “the standard.”
If you’re interested in either JSLint or JSHint, just know that they are much less extendable and often opinionated. Also, JSCS was a fourth option until the fall of 2015, but now it’s part of ESLint. For more information, check out this comparison of the different JavaScript linters.
At WDS, we’ve chosen to use ESLint. We love the features that come with ECMAScript 2015 (ES6) and ESLint supports them. We use Babel to compile our JavaScript into ECMAScript 5 (ES5), which has greater browser compatibility (this process could also be an entire blog post on its own, too).
A quick introduction to Sass Lint
There are a bunch of CSS linters:
- Style Lint – Can lint both regular ol CSS and Sass. Runs on JS. Powered by PostCSS. Supported by big corporations (like Facebook). Really fast!
- SCSS Lint – Runs on Dart (not Ruby). Is slower; doesn’t support the latest Sass features, but is very popular.
- Sass Lint – The newest of the three. It runs on Node and the codebase is based on ESLint, so option flags are similar. Can lint both Sass/SCSS syntaxes.
- CSSComb – Not really a linter, more like a fixer. Can reformat code based on rules. Think of it like PHPCBF, but for CSS.
- CSSLint – Very popular and extendable. Has support for almost every code editor and IDE out there. Only looks at CSS.
At WDS, we’re not concerned with what our CSS looks like. After all, it’s being compiled and sent through PostCSS plugins like CSS Nano. Since we only care of about linting SCSS, we only want to use a linter that deals with Sass/SCSS. So we’ve chosen to use Sass Lint. It’s similarities to ESLint make it a breeze to configure and use.
Install ESLint, Sass Lint, and the WordPress baseline config
1. Downloading is as simple as executing this NPM command in your Terminal:
$ npm install -g eslint sass-lint eslint-config-wordpress
2. Now, add both ESLint and Sass Lint to your $path so they can be run from the Terminal:
PATH=${PATH}:/usr/local/bin/eslint
PATH=${PATH}:/usr/local/bin/sass-lint
3. Close and reopen your Terminal so it can refresh the $path
4. Paste the following command into your Terminal. Press Enter to verify they were installed correctly:
$ which eslint sass-lint
Windows users would type: where.exe eslint sass-lint
If the install was successful, you should see both of their respective paths.
An introduction to configuration (ruleset) files
This is an important step. Do not overlook it…without a config/ruleset, the linter would not know what to do!
“Before you can sniff your code with a linter… you must first create a configuration file.”
– ancient Chinese proverb
This configuration file contains a ruleset, which will be used to sniff out code. The file type depends on the linter’s requirements. ELint, for example, wants a JavaScript (.js) file. PHPCS expects XML (.xml), and Sass Lint expects YAML (.yml). If you’re not sure, always refer to linter’s documentation!
This config file can be placed anywhere in your project. ESLint/Sass Lint will automatically scan the directory tree looking for it. What if you wanted to have a global configuration file? That’s possible, too; simply create and place .eslintrc.js or .sass-lint.yml in your Users/username folder as seen below:
Users
└── Greg
    ├── .eslintrc.js <- Always skipped if other configs present
    └── project
        ├── .eslintrc.js  <- Not used because a config is available higher up
        └── assets
            ├── .eslintrc.js  <- This config is used
            └── main.js
Note: you could also add the config to your project’s package.json.
Create a ESLint configuration file
A blank .eslintrc.js config looks like:
module.exports = {
 "env": {},
 "extends": "",
 "rules": {}
};
If you are developing themes or plugins that run on WordPress, the the config would look more like this:
module.exports = {
 "env": {
    "browser": true,
    "jquery": true,
    "es6": true,
 },
 "extends": "wordpress",
 "rules": {}
};
Let me explain:
- env = What kind of environment is our code going to be used in? Since we build modern websites with WordPress? browser, jquery, and ES6 are set to true.
- extends = A baseline ruleset. WordPress is a popular one, as well as AirBnB.
- plugins = Any third-party plugins, such as React.
- rules = Any custom rules not included with the baseline ruleset.
There are two ways to create a config:
1. Automatically generate one by running this command: eslint --init
ESLint will ask you a series of questions. The goal is to find out what sort of app you are building, so it can tailor the ruleset based on your needs.
2. Use a widely accepted shareable config, and customize it to meet your needs.
At WDS, we use wd_s as our starter theme on every project. We’ve worked hard to create a rock-solid ruleset that not only extends the WordPress baseline rules from core, but also incorporates all of the JavaScript code standards listed in the JavaScript handbook.
In my honest opinion, the .eslintrc.js config in wd_s is the most complete shareable config out there! Feel free to fork it, and add it to your theme folder. Read more about configuring ESLint in the User Guide.
Create a Sass Lint configuration file
Unfortunately, Sass Lint doesn’t have an automatic config file generator like ESLint. Luckily, the documentation around getting started is decent. Instead of creating a JavaScript or XML files, though, Sass Lint requires the config to be written in YAML. Don’t worry; YAML is easy to understand and even easier to write!
A very basic .sass-lint.yml looks like this:
# Linter Options
options:
  # Raise an error if more than 50 warnings are generated
  max-warnings: 50
# File Options
files:
  include: 'sass/**/*.s+(a|c)ss'
  ignore:
    - 'sass/vendor/**/*.*'
# Rule Configuration
rules:
  extends-before-mixins: 2
  extends-before-declarations: 2
  placeholder-in-extend: 2
  mixins-before-declarations:
    - 2
    -
      exclude:
        - breakpoint
        - mq
Here are the steps necessary to create a .sass-lint.yml
- Create a new file named
.sass-lint.yml - Place the file in your theme (or plugin) root directory.
- Add your rules and save.
- Sass Lint will automatically look for this file when it runs.
Check out the .sass-lint.yml config file in wd_s. Again, I believe it’s the most complete Sass ruleset out there, following both the WordPress CSS code standards and code standards here at WDS.
Learn more about the rules configuration on Github.
Install PHPCS
Just like ESLint and SassLint, PHPCS will look at your code and sniff out issues. In addition to sniffing PHP, PHPCS can also sniff CSS and JavaScript. The difference is you don’t have to create configuration files to get started (but you can, more on that below). PHPCS is ready to start sniffing in one step. Let’s go ahead and install it.
1. In your Terminal, paste the following command and press Enter:
$ composer global require "squizlabs/php_codesniffer=*"
2. Paste the following command into your Terminal. Press Enter to verify phpcs installed correctly:
$ which phpcs
Windows users would type: where.exe phpcs
If you see a path, then you can move on to the next steps.
Install WordPress Code Standards
This step will require you to clone the WordPress Code Standards (in PHPCS form) onto your computer using Git. I cloned them into /Users/Greg/Utilities/wpcs but you can put them wherever you want. Just remember: you will need to know which folder you cloned them to, in order to update them (via git pull) when updates are released!
1. In your Terminal, change directory to your User folder:
$ cd ~
2. Create a folder named “Utilities”:
$ mkdir Utilities
3. Change directory into the Utilities folder:
$ cd Utilities
4. Clone the WordPress Code Standards:
$ git clone -b master https://github.com/WordPress-Coding-Standards/WordPress-Coding-Standards.git wpcs
Configure PHPCS to use the WordPress Code Standards
Now that you’ve cloned the WordPress Code Standards, you’ll need to tell PHPCS to use them by default.
1. Paste the following command into your Terminal (obviously changing the path to wpcs to match your own) and press Enter.
$ phpcs --config-set installed_paths /Users/Greg/Utilities/wpcs
2. Paste the following command into your Terminal. Press Enter to verify WordPress Code Standards were correctly configured:
$ phpcs -i
You should see something like this:
The installed coding standards are MySource, PEAR, PHPCS, PSR1, PSR2, Squiz, Zend, WordPress, WordPress-Core, WordPress-Docs, WordPress-Extra and WordPress-VIP
Create a custom PHPCS ruleset
Just like ESLint and Sass Lint, you can create a custom PHPCS ruleset, which can extend a baseline config. This is called an “annotated ruleset” and must be an .XML file, and placed in the root of your theme or plugin. In wd_s, we’ve created phpcs.xml, which looks similar to this:
<?xml version="1.0"?>
<ruleset name="WordPress Theme Coding Standards">
  <description>A custom ruleset to take in account both WordPress and WebDevStudios code standards.</description>
  <rule ref="WordPress-Extra">
    <exclude name="Generic.WhiteSpace.ScopeIndent.IncorrectExact" />
    <exclude name="Generic.WhiteSpace.ScopeIndent.Incorrect" />
    <exclude name="PEAR.Functions.FunctionCallSignature.Indent" />
    <exclude name="WordPress.Files.FileName.NotHyphenatedLowercase" />
    <exclude name="WordPress.Arrays.ArrayDeclarationSpacing.AssociativeKeyFound" />
  </rule>
</ruleset>
This file tells PHPCS to use WordPress-Extra as the baseline ruleset, and then excludes some of the sniffs found in it. Whenever the WordPress Code Standards are updated, you may have to update this file, since new rules may have been added. Learn more about creating annotated rulesets on Github.
Running sniffs via the command line
In a later step, I’m going to show you how to configure some popular code editors to automatically lint while you write. However, running sniffs from the command line is a great way to generate reports, which can be shared with others. It also allows you to sniff out an entire directory or batch of files. Additionally, you can run sniffs using TravisCI on Github.
Sniff with PHPCS
In its most basic form, PHPCS can take a single parameter… the file you want to sniff. Let’s sniff functions.php inside the TwentySeventeen theme from WordPress via the command line:
$ phpcs wp-content/themes/twentyseventeen/functions.php
The results of which look like:
FILE: ...P/htdocs/testing/wp-content/themes/twentyseventeen/functions.php
----------------------------------------------------------------------
FOUND 5 ERRORS AND 2 WARNINGS AFFECTING 7 LINES
----------------------------------------------------------------------
 277 | WARNING | [ ] urlencode() should only be used when dealing
 | | with legacy applications rawurlencode() should
 | | now be used instead. See
 | | http://php.net/manual/en/function.rawurlencode.php
 | | and http://www.faqs.org/rfcs/rfc3986.html
 278 | WARNING | [ ] urlencode() should only be used when dealing
 | | with legacy applications rawurlencode() should
 | | now be used instead. See
 | | http://php.net/manual/en/function.rawurlencode.php
 | | and http://www.faqs.org/rfcs/rfc3986.html
 385 | ERROR | [ ] Expected next thing to be an escaping function
 | | (see Codex for 'Data Validation'), not
 | | 'get_bloginfo'
 401 | ERROR | [ ] Expected next thing to be an escaping function
 | | (see Codex for 'Data Validation'), not '$hue'
 402 | ERROR | [ ] Expected next thing to be an escaping function
 | | (see Codex for 'Data Validation'), not
 | | 'twentyseventeen_custom_colors_css'
 439 | ERROR | [x] When an array uses associative keys, each value
 | | should start on a new line.
 446 | ERROR | [x] When an array uses associative keys, each value
 | | should start on a new line.
----------------------------------------------------------------------
PHPCBF CAN FIX THE 2 MARKED SNIFF VIOLATIONS AUTOMATICALLY
----------------------------------------------------------------------

Time: 395ms; Memory: 8Mb
You can even pass option flags and scan entire directories:
$ phpcs -p -s -v -n wp-content/themes/. --standard=WordPress-Extra --extensions=php
And even include your annotated (custom) ruleset:
$ phpcs -p -s -v -n wp-content/themes/. --standard=wp-content/themes/wd_s/phpcs.xml --extensions=php
And finally, you can automatically fix warnings and errors with PHPCBF:
$ phpcbf -p -s -v -n wp-content/themes/. --standard=wp-content/themes/wd_s/phpcs.xml --extensions=php
Here is that command explained:
phpcs= The command to start PHPCS-p= Show progress-s= Show sniff codes in reports-v= Print verbose output-n= Do not print warningswp-content/themes/.= The directory or file to sniff--standard=WordPress-Extra= The code standards to sniff against (You can use your annotated ruleset here, too.)--extensions=php= PHPCS can look at more than just PHP (However, I just wanted to sniff PHP.)
Check out all the PHPCS flags and usage examples in the PHPCS documentation.
Set up code editors to automatically lint (while you write)
It’s nice to be able to scan entire directories, generate reports, and get a bigger picture from the command line. But it’s really nice to be able to have your code audited while you write.
Setup – Sublime Text 3
Arguably the most popular code editor on the planet, Sublime Text 3 can lint while you write with the help of some packages.
1. Using Package Control, you will need to download following packages:
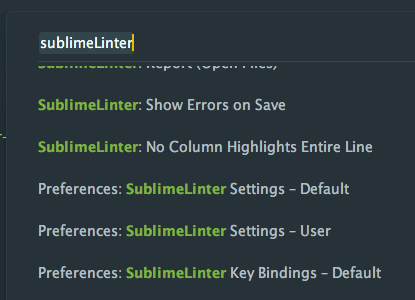
2. Open up the Command Palette (Tools –> Command Palette)
3. Type: “sublimelinter,” and click on “Preferences: SublimeLinter Settings – User”
4. Scroll down, and set the “lint_mode” to background (read more about other modes)
5. Scroll down to phpcs, and set the “standard” to WordPress-Extra6. Open a
php file, and save it immediately.
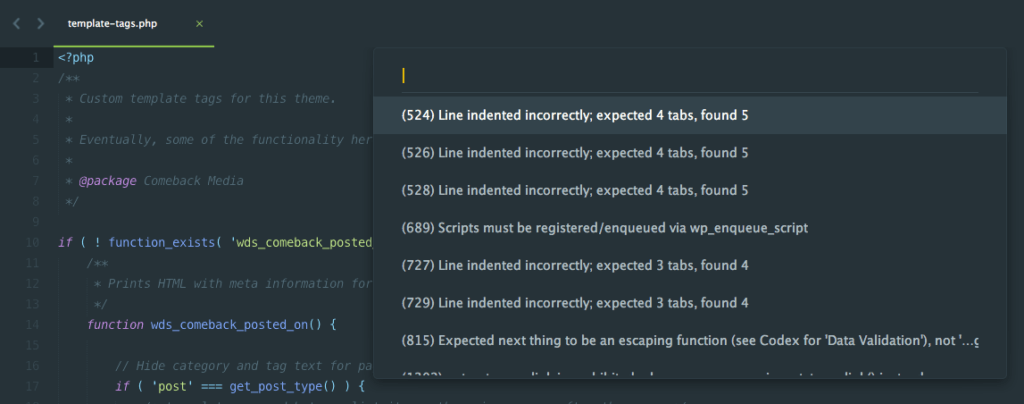
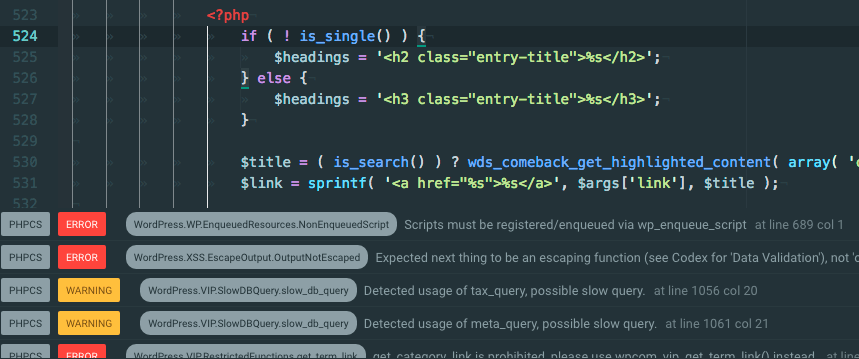
The results of a phpcs scan on template-tags.php in Sublime Text 3:
Note: Some developers have had trouble with SublimeLinter-phpcs. An alternative would be to install the Phpcs Package, instead. It actually uses PHPCS you installed using Composer earlier. I personally prefer this to the SublimeLinter version. To help you get started, view a sample config.
Setup – Atom
One of my favorite features of Atom is the ability to manage packages from the command line. That means getting set up with Linting, which is really easy.
1. Using the command line, paste the following command and press Enter:
$ apm install linter linter-phpcs linter-eslint linter-sass-lint
This will download the following base Linter and the related plugins.
- Linter
- Linter-eslint
- Linter-sass-lint
- Linter-phpcs (View example Linter-phpcs config)
2. Add the following to your config.json
  linter:
    lintOnFly: false
    showErrorTabLine: true
  "linter-phpcs":
    codeStandardOrConfigFile: "WordPress-Extra"
    tabWidth: 4
3. Open or create a new php file and save.
The results of a phpcs scan on template-tags.php in Atom:
Setup – phpStorm
phpStorm and I have a love-hate relationship. I love how powerful it is. I hate how slow and complex it is. phpStorm would be my daily driver, if I owned a faster computer. Just know, setting up linting in phpStorm is a bit more involved. Here goes…
Configure PHPCS
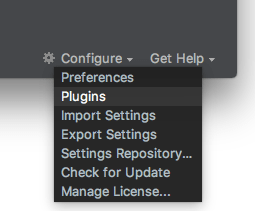
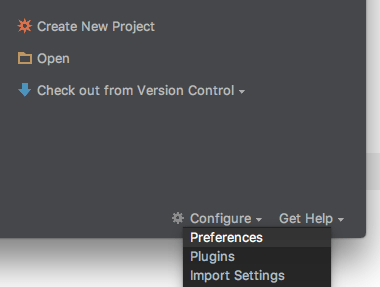
To enable global settings, click on the “Configure” cog, then “Preferences.”

Navigate to “Editor –> Inspections –> PHP –> Quality Tools.” Check the box for “PHP Code Sniffer validation.”
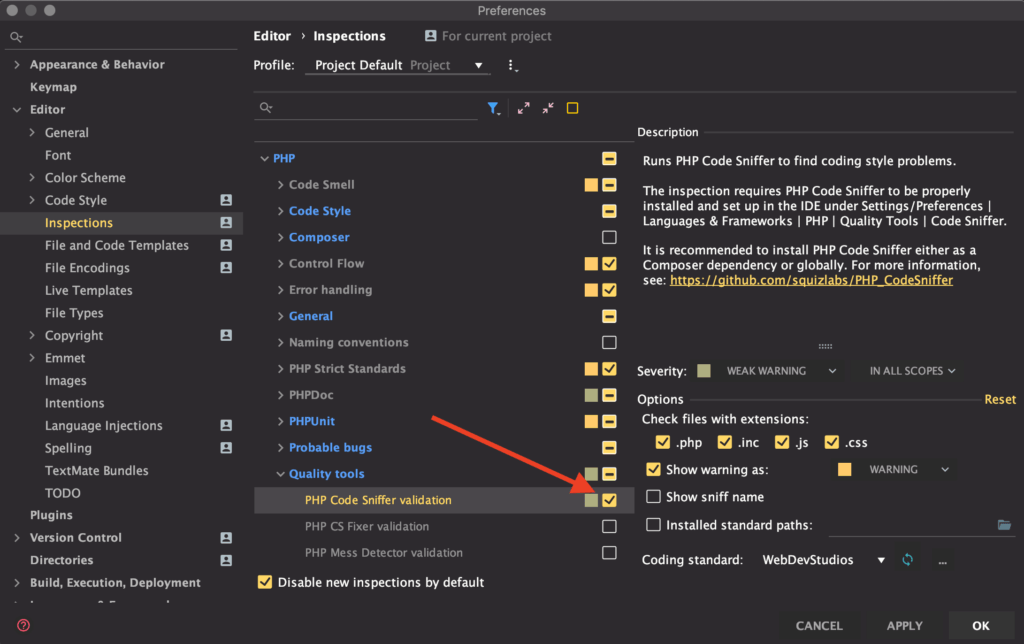
On the right hand side, select a standard from the Coding standard dropdown.
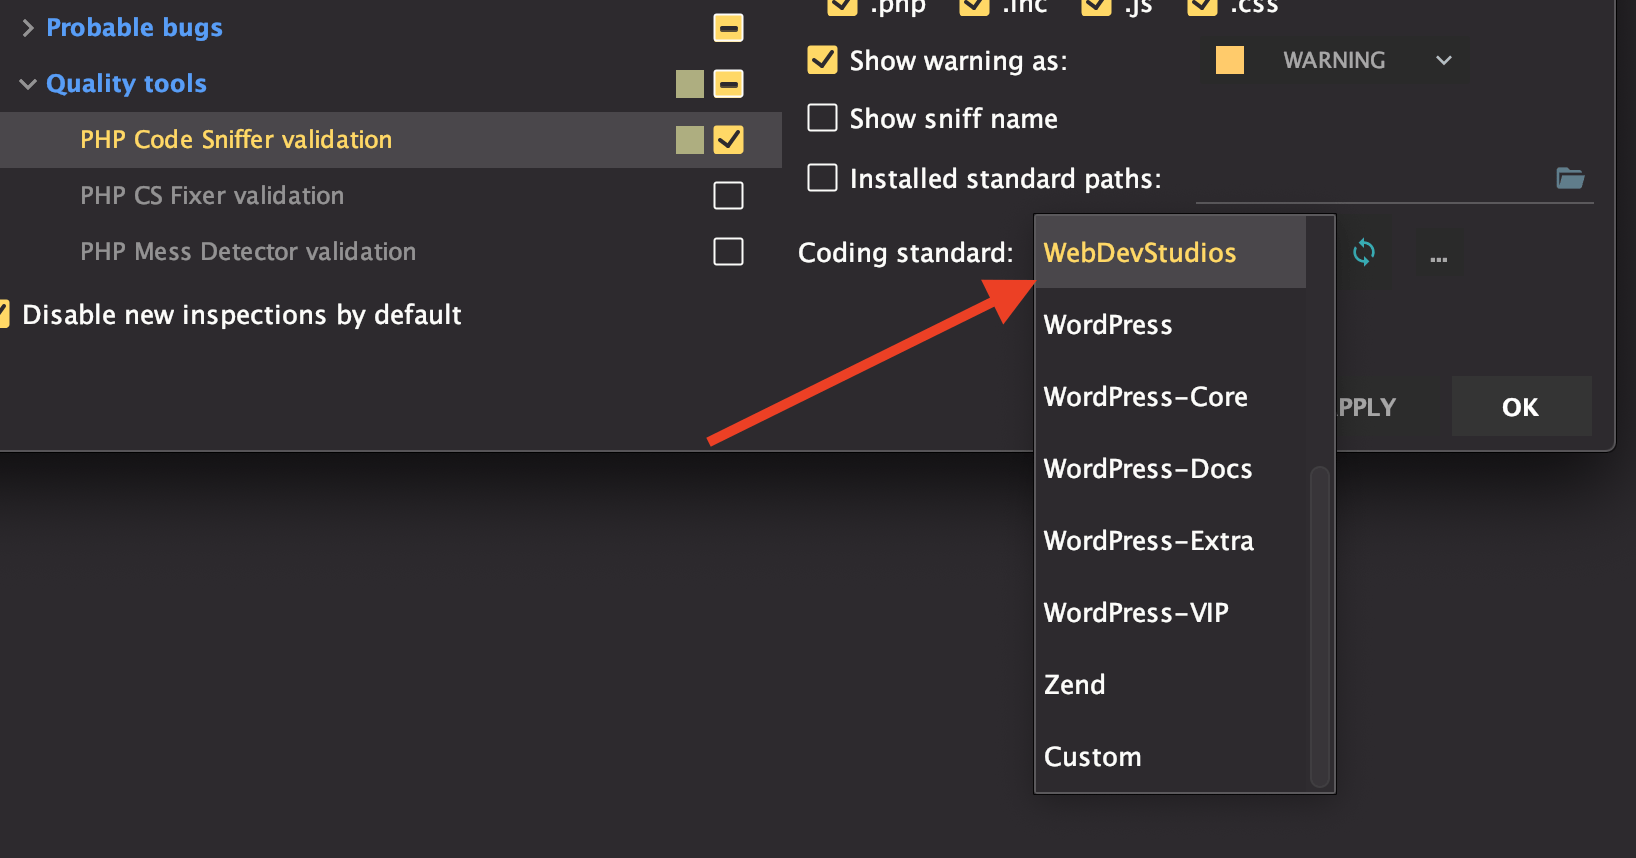
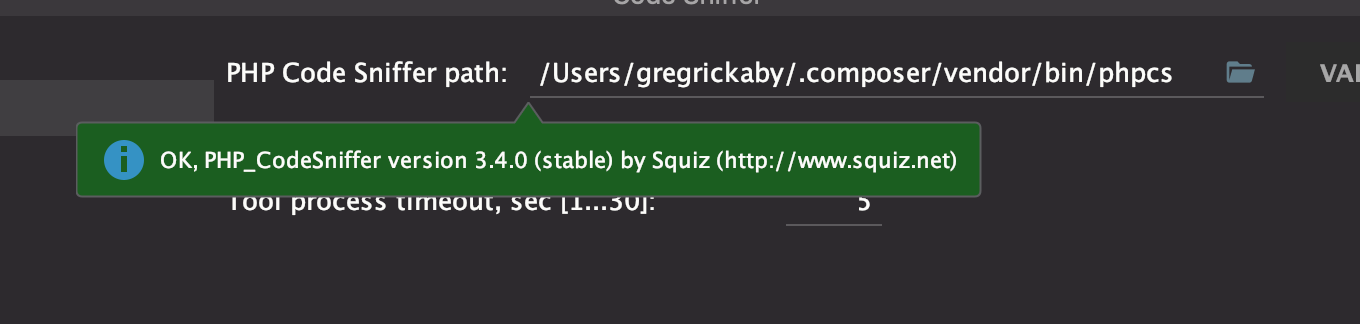
Navigate to “Languages & Frameworks –> PHP –> Quality Tools –> Code Sniffer.” Click on the box with three dots to the right of “Local.” phpStorm should have already populated the (phpcs) path.
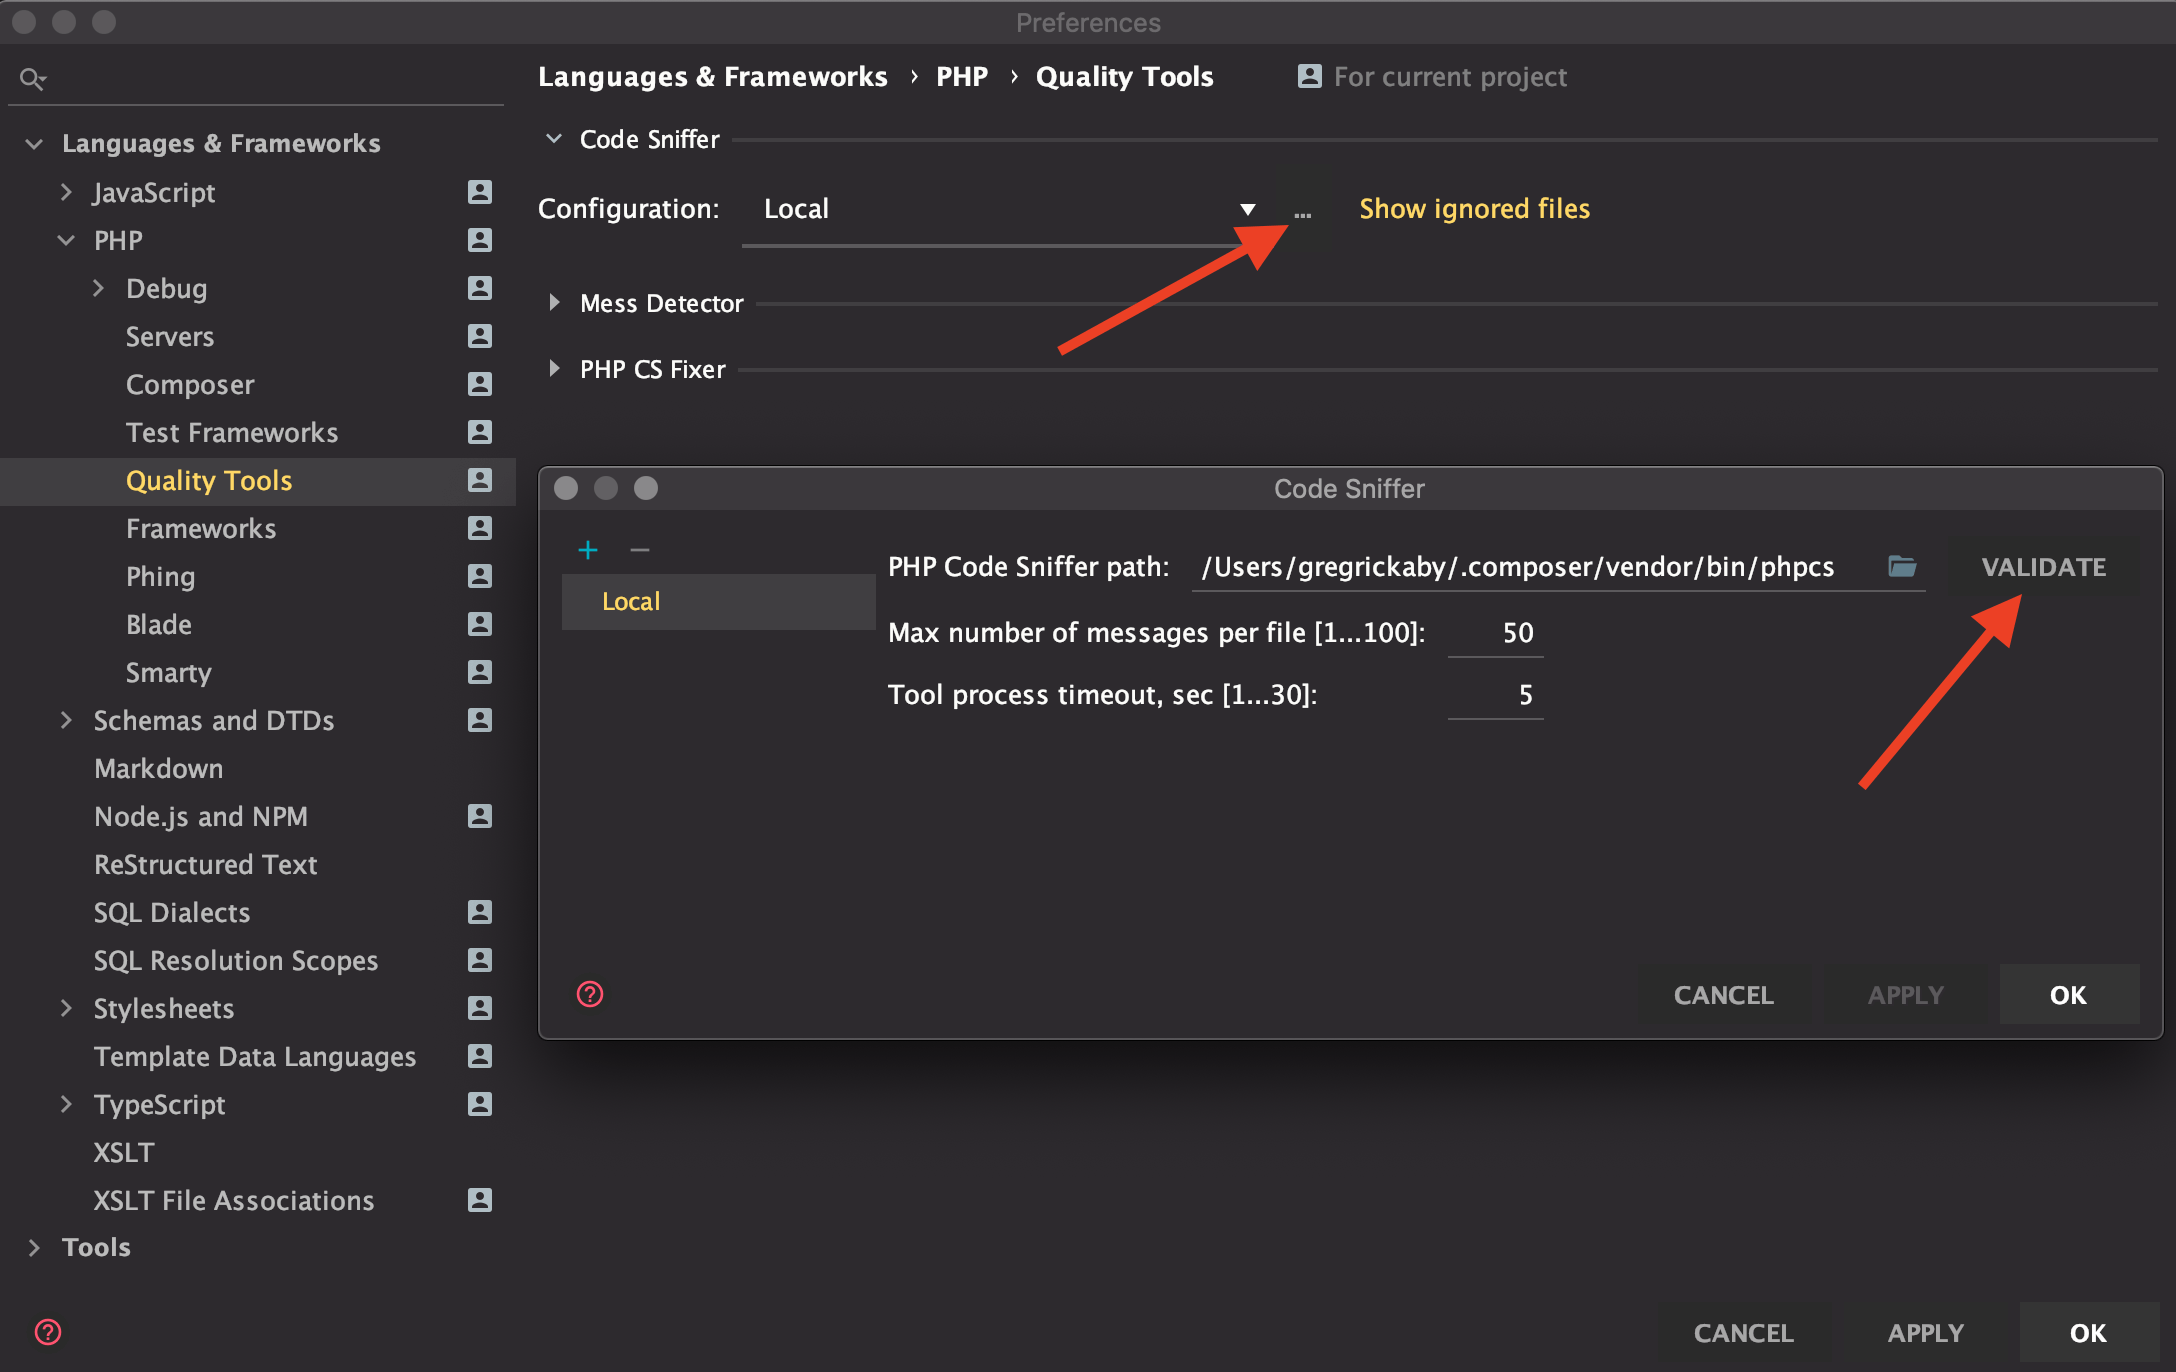
Click “Validate.”
Click “Ok” to save and close the dialog box.
Install ESLint & Sass Lint Plugins
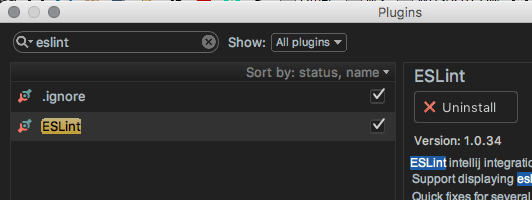
Click on the “Configure” cog and select “Plugins.”
Search for “eslint” and select “ESLint.” Click “Install.”
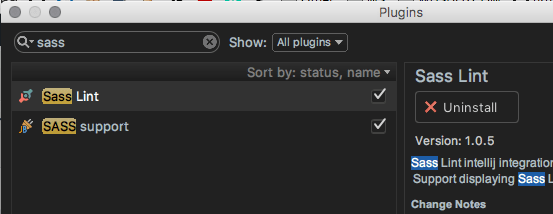
Search for “sass.” Select “SassLint” and click “Install.” Close the dialog box.
Configure ESLint & Sass Lint
Click on the “Configure” cog and select “Preferences.”
Navigate to “Other Settings –> ESLint.” Check the “Enable” box.
Place your mouse cursor in the “Node interpreter” and phpStorm should auto populate.
The same goes for “Path to eslint bin.”
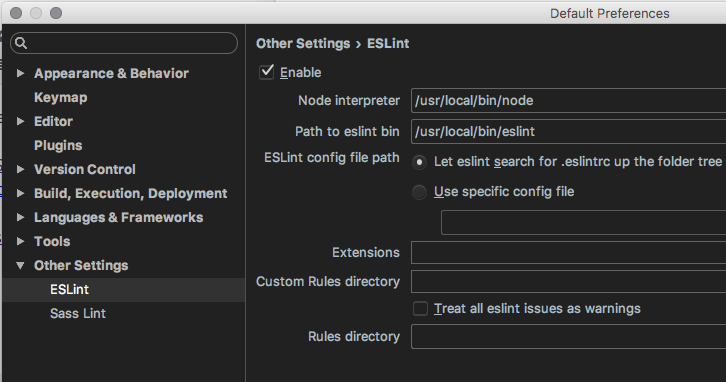
Navigate to “Other Settings –> Sass Lint.” Check the “Enable” box.
Place your mouse cursor in the “Node interpreter” and phpStorm should auto populate.
The same happens for “Path to sass-lint bin.”
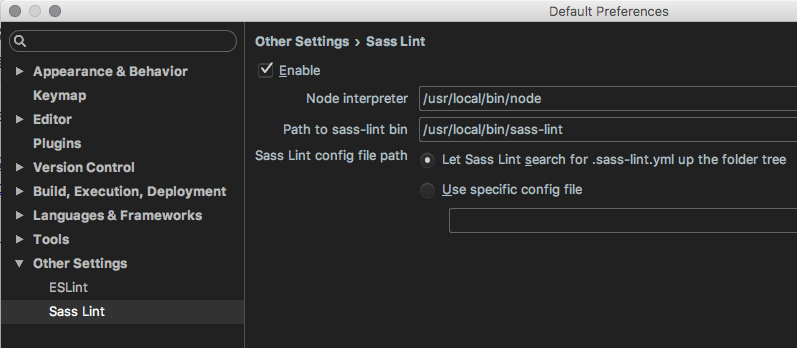
phpStorm will now lint in the background by default for all projects.
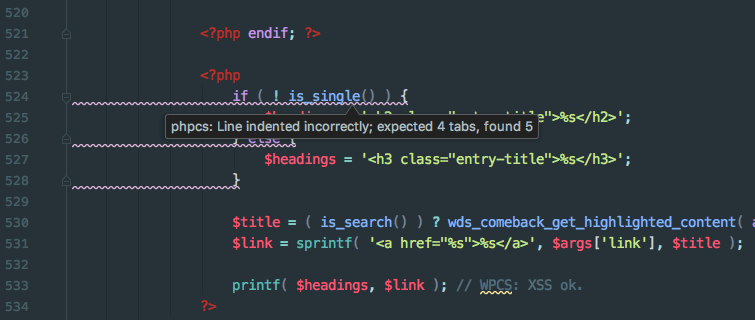
The results of a phpcs scan on template-tags.php in phpStorm:
Bonus: Editor Config
Did you know you can create code style standards for code editors and IDE’s? It’s true! From EditorConfig.org:
EditorConfig helps developers define and maintain consistent coding styles between different editors and IDEs.
With an Editor Config file, you can finally settle the never ending “tabs vs. spaces” debate for your project. By including an .editorconfig file in your project root, your editor/IDE will read this file and automatically do things like, “indent using tabs, size 4.”
Check out the .editorconfig from wd_s:
# EditorConfig is awesome: http://EditorConfig.org

# top-most EditorConfig file
root = true

# Unix-style newlines with a newline ending every file
[*]
end_of_line = lf
insert_final_newline = true

# Matches multiple files with brace expansion notation
# Set default charset
[*.{html,js,php,css,scss}]
charset = utf-8

# 4 space indentation
[*.{html,js,php,css,scss}]
indent_style = tab
indent_size = 4

# Matches the exact files
[{package.json,bower.json,.bowerrc,.eslintrc.js,.travis.yml,.sass-lint.yml,phpcs.xml}]
indent_style = space
indent_size = 2
This is just another way standards can help your team focus on solving problems, instead of cleaning up code minutia.
Conclusion
Linters are a very powerful tool, which I think every developer should have in their tool kit, especially if you work with a team. If you do (work with a team), talk to each other about which set of standards to follow. Then, discuss which sniffs to ignore. Once you decide to write code a certain way, add it to a ruleset!
I can speak from personal experience, when we added linting to our workflow at WDS, it not only helped everyone become better developers, but made productivity killing conversations like, “I forgot, should I add spaces to my parenthesis?” go away entirely. Thank goodness.
Linting code like a boss means providing your clients with bulletproof code that can be easily maintained by future developers. Now that’s smart.
BTW: I’ve created a playlist of YouTube videos based on this blog post, check it out!
Great article, thanks for taking the time to write this up.
I’m curious as to how you are automatically fixing SCSS lint smells. I’ve looked at CSSComb, but it seems currently unmaintained. Also the sub headings and content in your index at top of page ( Sniff with Sass Lint, Sniff with TravisCI ) don’t seem to be in the main article.
Thanks very much for this in-depth tutorial. You are a god send. Really helps me improve code I write. Plus, it gives me confidence that the code I write is as per best coding practices.
I have a question though. Running PHPCS on my old projects, 99% of the errors reported by PHPCS is spacing, tabbing, line, array etc. errors. Manually doing them would easily take many many hours and its virtually impossible for such non-productive task where end output will still be zero.
I tried running beautifier with not much help.
Is there a tool/command technique available that automatically fixes all these common errors?