

On my first day working at WebDevStudios, Greg Rickaby told me that one of the best things about working here is that I would constantly be getting to learn new technologies. He wasn’t lying.
In my second week, I was tasked with creating a custom profile page for BuddyPress users. No problem, right? Wrong.
Up to this point, I had never used BuddyPress in any way, let alone customize it.
Lucky for me, there are a lot of awesome people who work at WDS who are all about helping each other, even the new guy.
In this post, I want to share with you what I have learned about creating custom templates for BP. I will provide an overview of how you can customize BP out-of-the-box, and then show you how we do it here at WDS using the BP Project Framework plugin.
This is not the ‘be all, end all’ of BP templating, but more of a brief look at it through the eyes of someone who is also in the process of learning!
BP Theme Compatibility
In version 1.7, BuddyPress introduced theme compatibility, which allows template files to be stored directly in a themes folder and will override the default templates. This is also known as template overloading and works much like the WordPress Template Hierarchy. As a result, this makes BuddyPress compatible with virtually any WordPress theme.
The way template overloading works in BuddyPress: It will look in your child/parent theme for a folder named either ‘community’ or ‘buddypress’ and then use the template files placed there first. If no files are found, BP will fall back to using the defaults.
There are two key points to keep in mind when setting up the template folder/file structure in your theme:
- Make sure to copy templates directly from the BP plugin – /bp-template/bp-legacy/buddypress/
- Be sure to replicate the plugin file structure
copy from plugin: /bp-template/bp-legacy/buddypress
to theme: /your-theme/buddypress/
Protip: You can also override default BP CSS by adding a ‘css’ folder the BuddyPress/ folder you created.
From here, it’s just a matter of copying over the files you want to customize into your theme and making the changes you want.
You can get the full details on how theme compatibility works by checking out this BuddyPress codex article.
Using the BP Project Framework Plugin
While placing your custom BP templates in your theme folder works perfectly fine, what would ever happen if you wanted to switch themes? Yep, you guessed it. You would end up losing all of those customizations. You would end up needing to copy over the custom BP template files you created into your new theme.
Wouldn’t it be nice if you could switch themes on the fly and retain your BP customizations? The BP Project Framework makes this possible!
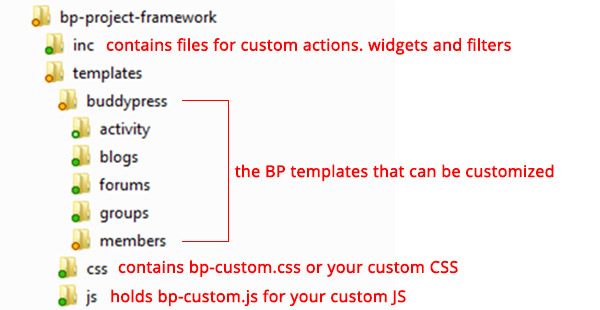
As stated on its GitHub repo, “This plugin is a boilerplate for new custom BuddyPress projects.”’ On install, it will create a new set of boilerplate templates that includes CSS and JS files which can be customized. Pretty cool! For even more awesomeness, there is also a /inc/ folder that includes files where you can put custom template tags, actions, filters and widgets.
I learn best by doing, so let’s step through the process of installing the BP Project Framework and then make a few minor customizations so you can see just how easy it is!
I will assume that you already have BuddyPress installed. I will also note that I’ve install the BuddyPress Default Data for testing purposes.
Installation
Head on over to the BP Project Framework GitHub page and download the files as a .zip.
Install the plugin through the WordPress admin panel.
After the installation is complete, browse to wp-content/plugins/bp-custom-framework and review the folder/file structure.
Customizations
Now that the BP Custom Framework is installed, let’s work through making a few minor customizations for the profile view.
Here is what the default public view looks like:
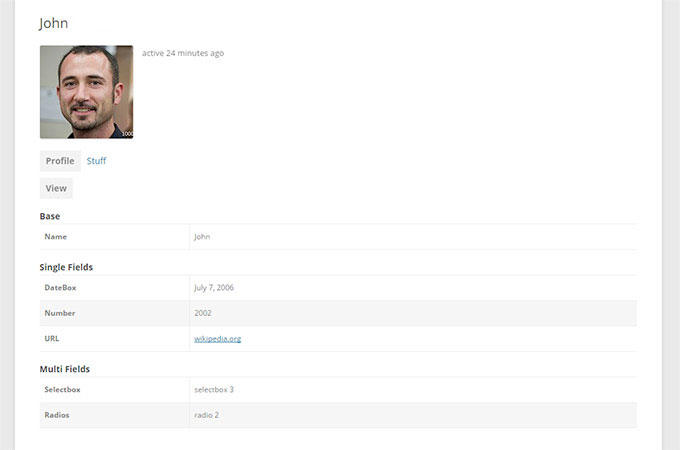
By default, the profile fields are displayed in a <table> format. Why don’t we convert it so the profile fields utilize an unordered list? Let’s also turn them into a three column layout while we are at it!
Change 1: Convert Table Layout
Converting the table layout to use an unordered list is a pretty simple process.
- Change out the <table> declaration to be a <ul>
- Replace the <tr> with <li>
- Replace <td> with <div>
File: /bp-custom-framework/templates/buddypress/members/single/profile/profile-loop.php
<?php do_action( 'bp_before_profile_loop_content' ); ?>

<?php if ( bp_has_profile() ) : ?>

    <?php while ( bp_profile_groups() ) : bp_the_profile_group(); ?>

        <?php if ( bp_profile_group_has_fields() ) : ?>

            <?php do_action( 'bp_before_profile_field_content' ); ?>

            <div class="bp-widget <?php bp_the_profile_group_slug(); ?>">

                <h4><?php bp_the_profile_group_name(); ?></h4>

                <ul class="profile-fields">

                    <?php while ( bp_profile_fields() ) : bp_the_profile_field(); ?>

                        <?php if ( bp_field_has_data() ) : ?>

                            <li<?php bp_field_css_class(); ?>>

                                <div class="label"><?php bp_the_profile_field_name(); ?></div>

                                <div class="data"><?php bp_the_profile_field_value(); ?></div>

                            </li>

                        <?php endif; ?>

                        <?php do_action( 'bp_profile_field_item' ); ?>

                    <?php endwhile; ?>

                </ul>
            </div>

            <?php do_action( 'bp_after_profile_field_content' ); ?>

        <?php endif; ?>

    <?php endwhile; ?>

    <?php do_action( 'bp_profile_field_buttons' ); ?>

<?php endif; ?>

<?php do_action( 'bp_after_profile_loop_content' ); ?>
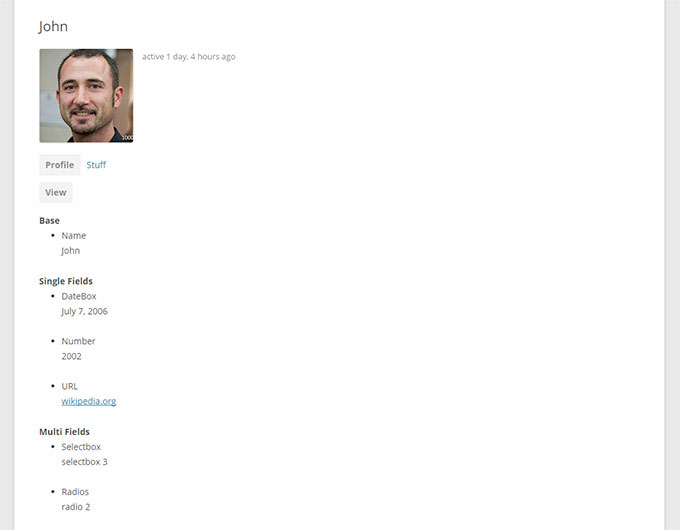
The result doesn’t look good, but we are making progress!
Change 2: Apply Styles
Before we get to the style changes, I would like to note that it’s always best to prefix your custom BP styles with #buddypress.
Let’s go ahead and add some simple styles to create a 3-column layout and dress up the unordered list.
File: /bp-custom-framework/templates/css/bp-custom.css
#buddypress .bp-widget {
    box-sizing: border-box;
    float: left;
    padding-right: 5%;
    width: 33%;
}

#buddypress div.profile h4 {
    border-bottom: 1px solid #eee;
    margin-bottom: 15px;
}

#buddypress .profile-fields {
    list-style-type: none;
}

#buddypress .profile-fields > li {
    line-height: 36px;
    margin: 0;
    padding-left: 5px;
}

#buddypress .profile-fields > li:nth-child(odd) {
    background: #eee;
}

#buddypress div.label,
#buddypress div.data {
    display: inline-block;
}

#buddypress div.label {
    font-weight: bold;
    padding-right: 20px;
    width: 25%;
}

#buddypress div.data p {
    margin: 0;
}
Here are the results after applying our styles:
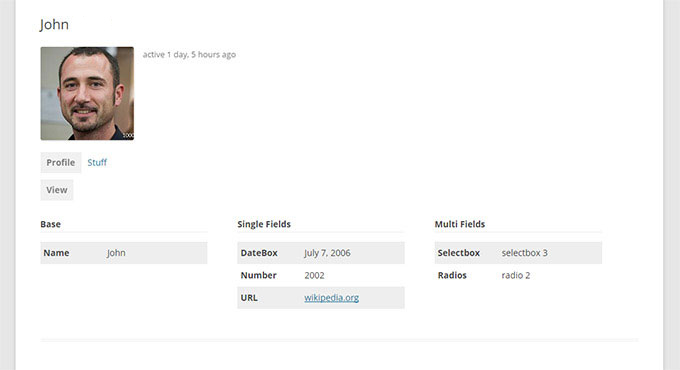
Endless Possibilities
The customizations I showed you in this post don’t even begin to scratch the surface to the possibilities you have.
My goal for this post was to show you what I’ve learned about creating custom BP templates and to also give you a peak at how we roll custom BuddyPress solutions at WDS.
In the end, the best way to learn would be to install BuddyPress and the BP Project Framework and see what kind of awesome customizations you can come up with!