

Social networks run on notifications and BuddyPress helps make that happen. BuddyPress sends out notifications for various actions on the site, like when you get a message from a friend or when someone replies to your status update. Though BuddyPress sends out quite a few notifications, you might want to add custom notifications for other actions. For example, you may want to send out a notification when a friends birthday is near.
In this tutorial, we will go over the code necessary to send a member a notification when someone comments on their blog post. You don’t need a lot of code to add notifications; they just require special formatting.
The first thing required is that notifications are attached to a BuddyPress Component. No worries though–you do not actually have to create a full component! It just needs to be registered by adding to an array. Adding a “fake” component to the registered component array is done by adding a filter to bp_notifications_get_registered_components. In the code snip below we are adding a fake component called “custom”. You can name this fake component anything. We will use this name later when adding the notification.
function custom_filter_notifications_get_registered_components( $component_names = array() ) {

    // Force $component_names to be an array
    if ( ! is_array( $component_names ) ) {
        $component_names = array();
    }

    // Add 'custom' component to registered components array
    array_push( $component_names, 'custom' );

    // Return component's with 'custom' appended
    return $component_names;
}
add_filter( 'bp_notifications_get_registered_components', 'custom_filter_notifications_get_registered_components' );
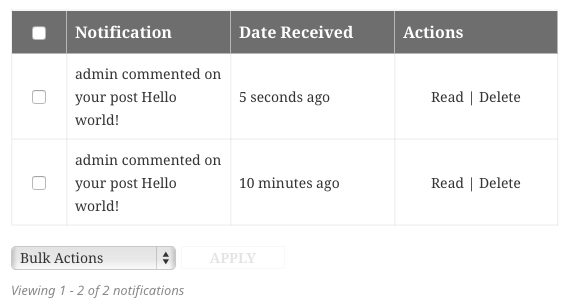
Once we have the fake component registered, we need to create a function to format what is actually displayed on the members notification table list. In the image below you can see the column “Notification”. The content of this box is what we need to format. This should be a short message to explain the notification and to link back to a piece of content. In this case, it’s the comment link:
There are a couple caveats when formatting this callback function. We need to take into account the admin bar markup. We need to pass back a string and also an array. Formatted as such:
// WordPress Toolbar
if ( 'string' === $format ) {
    $return = apply_filters( 'custom_filter', '<a href="' . esc_url( $custom_link ) . '" title="' . esc_attr( $custom_title ) . '">' . esc_html( $custom_text ) . '</a>', $custom_text, $custom_link );

// Deprecated BuddyBar
} else {
    $return = apply_filters( 'custom_filter', array(
        'text' => $custom_text,
        'link' => $custom_link
    ), $custom_link, (int) $total_items, $custom_text, $custom_title );
}
The other caveat is adding a notification doesn’t really add anything until it is displayed. The only thing that is saved is the item id (what you want to link to). In our code we are doing notifications for comments, so we save the comment id and then during the call back formatting function get the required data to display. See the code below where we get the $item_id and use it with get_comment() to compile whats shown in that Notification box in the table list. The $item_id is set during the action that adds the notification. The $custom_text can be customized to fit the content you are linking to.
The format code needs to be wrapped in an action check; if this is not done it will reformat every notification. Note: Notifications are built each time they are displayed. In the code example I have set the action to be ‘custom_action’. You can name this anything–when adding the notification later you specify this action.
function custom_format_buddypress_notifications( $action, $item_id, $secondary_item_id, $total_items, $format = 'string' ) {

    // New custom notifications
    if ( 'custom_action' === $action ) {

        $comment = get_comment( $item_id );

        $custom_title = $comment->comment_author . ' commented on the post ' . get_the_title( $comment->comment_post_ID );
        $custom_link  = get_comment_link( $comment );
        $custom_text = $comment->comment_author . ' commented on your post ' . get_the_title( $comment->comment_post_ID );

        // WordPress Toolbar
        if ( 'string' === $format ) {
            $return = apply_filters( 'custom_filter', '<a href="' . esc_url( $custom_link ) . '" title="' . esc_attr( $custom_title ) . '">' . esc_html( $custom_text ) . '</a>', $custom_text, $custom_link );

        // Deprecated BuddyBar
        } else {
            $return = apply_filters( 'custom_filter', array(
                'text' => $custom_text,
                'link' => $custom_link
            ), $custom_link, (int) $total_items, $custom_text, $custom_title );
        }

        return $return;

    }

}
add_filter( 'bp_notifications_get_notifications_for_user', 'custom_format_buddypress_notifications', 10, 5 );
Now we need to hook to an action to run the bp_notifications_add_notification() function and save that item id. You can hook to almost any action for the type of notification you want to send. That birthday notification example mentioned at the beginning of this tutorial could be hooked to run on login and then cycle through friend ids and then when it finds a friend with a birthday in a set time, save that user id and then the format callback function can retrieve that friends id and display an appropriate notification.
In our case we are hooking to wp_insert_comment. This hook allows us to get the comment id to save as the item id to be used in the format callback function. You also need to provide the user id of who will be receiving this notification.
In this case, we want to notify the post author. We can tap into the wp_insert_comment hook, as it has the comment object and provides the post id the comment is getting attached to. Then we can get the author id from the get_post() response. You will see an argument for ‘component_name’ and ‘component_action’. The ‘component_name’ is the fake component we registered in custom_filter_notifications_get_registered_components(). The ‘component_action’ is the action we wrapped around our formatting code earlier. This is so the format code only runs on specific notifications.
function bp_custom_add_notification( $comment_id, $comment_object ) {

    $post = get_post( $comment_object->comment_post_ID );
    $author_id = $post->post_author;

    bp_notifications_add_notification( array(
        'user_id'           => $author_id,
        'item_id'           => $comment_id,
        'component_name'    => 'custom',
        'component_action'  => 'custom_action',
        'date_notified'     => bp_core_current_time(),
        'is_new'            => 1,
    ) );

}
add_action( 'wp_insert_comment', 'bp_custom_add_notification', 99, 2 );
Thats about it–only three functions to get custom notifications in BuddyPress. Click here for the full code in this tutorial. If you got any questions, post in the comments and I’ll get notified…see what I did there?