The topic of testing comes up often at WebDevStudios—whether we’re on-boarding a new project, or we’re digging out bugs on existing work, and even when we talk about our own internal tools. Testing is a common part of software development that often gets overlooked, especially when you consider a website that might be more “static,” such as a WordPress blog. But regardless of whether your site is running a rich web application or serving up your favorite recipes to your readers, End-to-End (E2E) testing has benefits for everyone.
Today, I’m going to walk through getting started with Cypress.io—a JavaScript-based E2E platform that’s easy to get up and running and is powerful in numerous ways that could make you rethink testing.
What Exactly is “End-to-End Testing?”
End-to-end testing means testing your application in a way that each component, from start to finish, is tested to do what it’s supposed to do. As an example, imagine a website that has a “Contact Us” form. Testing this would mean filling out the form, clicking the submit button, and expecting to see a result afterwards of something along the lines of “Thank you for contacting us.”
This is a simple example; other examples include testing a Single Page Application, or a complex search with filtering and sorting. These kinds of tests aren’t hard for an individual to do, certainly, but as people, we’re prone to mistakes. Maybe you forget to see what happens if a checkbox is toggled on or off, or you don’t remember to try filtering a list after sorting to see if the sorted state remains after filtering.
With a testing suite, you can write tests that are both descriptive and repeatable. This helps us remember what we’re testing and ensures that with every iteration of a site or application, we can know what tests to run. Cypress also provides the ability to “step through” your tests after they complete, allowing you to see the application’s state at any given point as it was when the test was running.
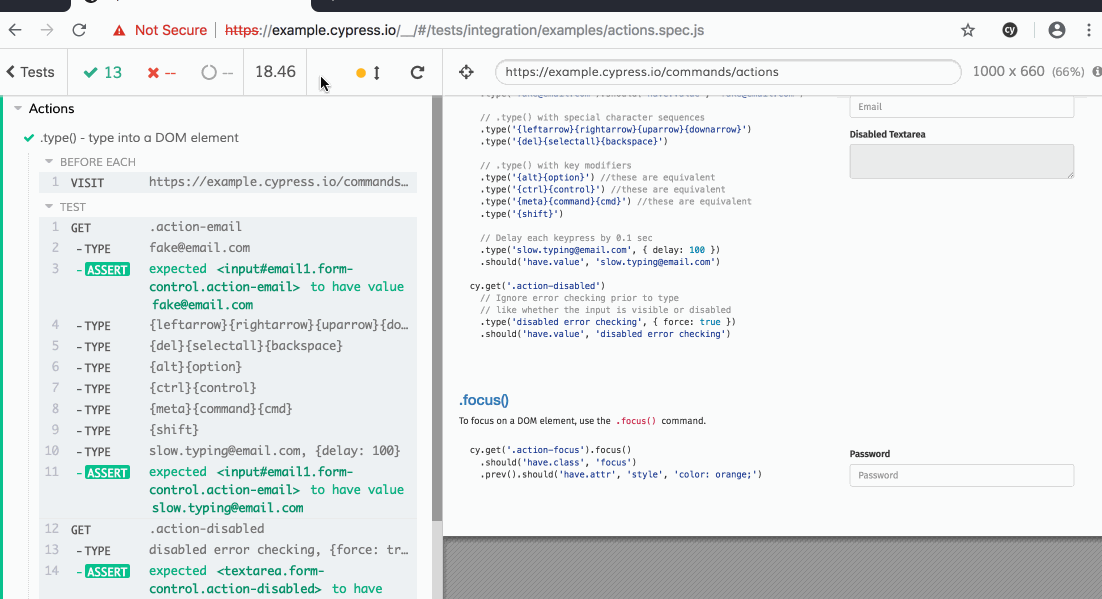
The above GIF shows the Cypress sample test spec called “actions.spec.js.” You can see that Cypress opens its own browser, runs your tests, and allows you to jump to any point in the test history and see the application state as it was right then. Awesome, right?
Getting Started
You can find out detailed instructions for getting started with Cypress on their Installing Cypress page. For the purposes of this post, I’m not going to go into great detail, but I will walk through the simplest installation method and one most people are likely familiar with: the Node Package Manager. Before going any further, it’s important to note the system requirements for Cypress as of the time of this writing:
- Mac OS 10.9+ (Mavericks+), only 64bit binaries are provided for macOS
- Linux Ubuntu 12.04+, Fedora 21, Debian 8, 64-bit binaries
- Windows 7+, only 32bit binaries are provided for Windows
Now, fire up your terminal and go into your project’s root folder. Typically, this is where you’re already using node (if you use it). If you put your node modules elsewhere, just change to the proper location. Next, you’ll use the following command to start the installation process:
npm install cypress --save-dev
You may get a brief prompt from Cypress, but otherwise the package should install and plop you back in the terminal. Next, let’s fire Cypress up with the following:
$(npm bin)/cypress open
Firstly, “$(npm bin)” will cause npm to echo the location of the current directory’s binary folder for Node. Secondly, we take that output and concatenate it with the “cypress open” command. On my computer, this expands to “/Users/phatsk/src/WDS/local/playground/app/public/wp-content/node_modules/.bin/cypress open.” You should now see the Cypress screen:

Running Tests
Now that you have Cypress installed and running, you can peruse the samples provided in the “examples” folder. Try clicking one to open a Chrome window that will run the test and give you feedback to each test step. Here you can also click around, expanding tests and using Cypress’s “rewind” feature to see the previous state of the application it’s testing. In this case, the example tests all run against Cypress’s own documentation.
Writing Tests
This is where we start to have fun! Writing tests in Cypress is pretty easy. You just create a JavaScript file in the “cypress/integration/” folder, save it, and it should appear in the main Cypress window after a moment. For this post, I’m going to create a file called “cypress/integration/blog.js” and I’ll add the following content:
describe( 'Testing WebDevStudios.com', function() {
  it( 'Visits the Contact Page', function() {
    cy.visit( 'https://webdevstudios.com' );
    cy.contains( 'Contact Us' ).click();
    cy.url().should( 'include', '/contact' );
  } );
} );
The above script is fairly basic, and a good place to start. Let’s take a look at it, line-by-line:
describe( 'Testing WebDevStudios.com', function() {
This line simply defines our test suite. Here you would give your set of tests a descriptive name.
it( 'Visits the Contact Page', function() {
Cypress tests are written in a way that kind of makes sense when you read them out loud. For instance, the start of this particular test in our suite describes what we want the test to do—“it Visits the Contact Page.” This line also opens another new function, which will contain our actual test code.
cy.visit( 'https://webdevstudios.com' );
The “cy.visit” method visits a URL. This is a good time to have a side conversation about testing applications: you should only test applications you own.
The Cypress documentation goes into more detail in “Writing Your First Test.” Generally speaking, you won’t be doing much good if you’re trying to test a website or application that you don’t control, and if you’re looking for something to do automated tasks to test for things like load-balancing, there are much better tools than Cypress.
cy.contains( 'Contact Us' ).click();
The “cy.contains” looks for an element with the text passed to the “contains” method inside of the elements you are selecting against. Since we aren’t chaining the contains command to any selector, it will return the first element on our page that contains the text “Contact Us.” Once we have that element, we want Cypress to “click” the element.
cy.url().should( 'include', '/contact' );
Finally, we want to ensure that what we clicked took us to the proper place. For that, we assert that the current URL (via “cy.url()”) should include the text “/contact.” The “should()” method is an assertion, and if it passes or fails will be denoted in the Cypress log window.
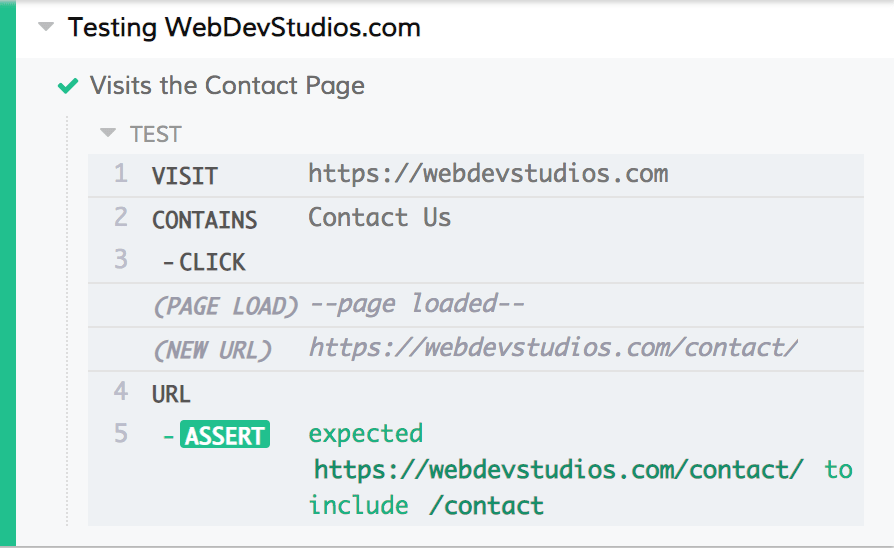
You can see that Cypress has some pretty nifty features. It has methods for traversing the DOM, finding particular nodes based on text or selectors, and even is aware of when pages are loading so that your tests don’t run too early.
Where to Go Next?
Now that you have a basic idea of how Cypress works, you can start exploring their documentation and hopefully use Cypress to help you better test your applications. I know I’m going to be using it in my own work to help test the applications we create for our clients.