If you’ve wanted to dive into Jenkins, chances are that the first thing on your mind is deployments. And if you’re like me and have absolutely no idea what you’re doing, it’s even more likely that you will be completely confused on how to approach it. I mean let’s be real, developing a Jenkins pipeline for WordPress projects is not for the faint of heart. There is no one single solution to your specific problem, and only you can solve your puzzle for you and your team. Hopefully, what I’m about to divulge to you will help you in your quest.
Do This First
This article assumes you have installed Jenkins. If you have not installed Jenkins yet, I followed this great how-to from my friends over at Digital Ocean. Go ahead and install Jenkins now. I’ll wait.
Secondly, you absolutely must have the ability to run shell scripts on your Jenkins server (this is an absolute must for the build process). Now, lastly, the build process covered in this article is entirely optional, and is intended just to show you what can be done, and how I’m using it.
Build Process Requirements
The build process uses two main build scripts you may be familiar with: Grunt and Gulp. But there’s also an optional one—Bower. These scripts take the guesswork out of compressing and joining your files, and, you guessed it, are managed by Node Package Manager (NPM). Now, I’m not going to go into detail or reinvent the wheel on these how-tos, so if you don’t have NPM installed on your Jenkins server, you’ll need to go back over to Digital Ocean and give this article a read: Installing NodeJS on Ubuntu.
Node, Grunt, Gulp, and Bower are not your only requirements here. For the actual deployment process, you’re going to need Composer. This step is entirely optional and completely dependent on the manner in which you wish to deploy. For simplicity, I use Composer. So, make sure that’s available. Oh, and don’t forget that Composer uses PHP…. yeah, there’s that!
Why So Many Things?
Well, let’s recap. You need the following for deployments:
- Composer
- PHP
And if you’re building your project automatically, you’ll need these:
- Node
- Grunt
- Gulp
- Bower
Wow! That’s a lot, right? Well, when you consider the amount of node_modules one typically has within a build setup… not really. The fact is, once you have these set up, you’re rarely going to need to do anything with them at all. All the configuration will be at the project level, aside from when it comes time to update one of these core items. However, at the Jenkins level, I use Blue Ocean. Now that I understand how to build a pipeline, using a Jenkinsfile with Blue Ocean makes it SUPER simple for me.
I bet at this point a lot of WTFs are going around in your head. It’s probably ready to explode. That’s completely understandable. It took me almost a month of trial and error to get where I am now with Jenkins. Bear with me. I’ll get you through this.
Setting Up Your Project
For projects at WebDevStudios (WDS), we typically use our plugin generator and our theme framework, appropriately named WD-Underscores ( wd_s ). While your tools/files may be different than mine, the process is the same.
Ignore files that are built automatically (Composer vendor files, for example ). If you’re a solo developer, you may not need to ignore these, but at the agency level, you will. Ignoring build files prevents a multitude of merge conflicts for us; therefore, speeding up our overall development process.
Ignoring Build Files
This process is entirely dependent on you, and what you do or do not want to commit to version control. For teams, it’s easier for you to ignore compiled files like style.css and other concatenated files like project.js. While on the other hand, maybe you want to include the _s.pot file in version control. It’s completely up to you. For me, keeping these files out of version control helps cut down on merge conflicts.
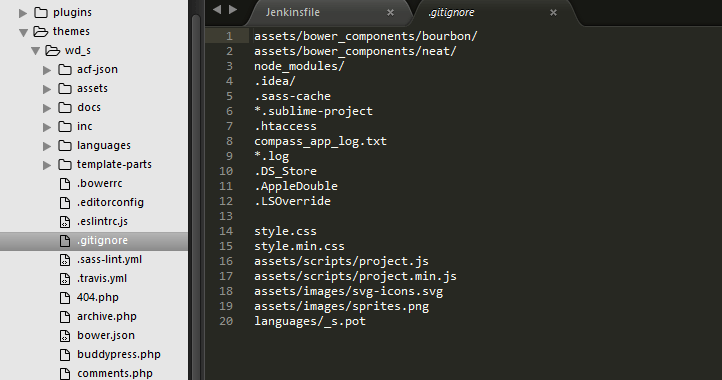
To ignore files, just create a .gitignore file, in the folder you wish, and specify files you want to not version control. If, however, they’re already version controlled, you’ll want to do git rm <filename> to remove them from version control. This obviously deletes the file, so if you still want to keep it, make sure to use the –cached flag. (More on git rm command in the official docs.)
As you can see in the image, some common files are ignored, along with the products of the build process. If you’ve never run the gulp task in wd_s before, it builds scripts, styles, images, and even the translation file. This, of course, depends on your build tasks and if you’re producing compiled and/or minified files.
Set Up Deployments
For the longest time deployments was a mystery to me—self-deployments that is, meaning automated self-deployments. I mean, we all know Beanstalk and Deploy-Bot, sure. You could use those to deploy your repository. But, where’s the fun in that? Why not step out of your bubble and learn something new? Which brings me here…
Enter PHPLoy. It can be installed via Composer. Set it up during the build process, and with one configuration file within your repository, it will deploy based on the branch that is pushed to. Simply put, dare I say, it’s the simplest and full-featured deploy solution I’ve found yet for the DIY-er in me.
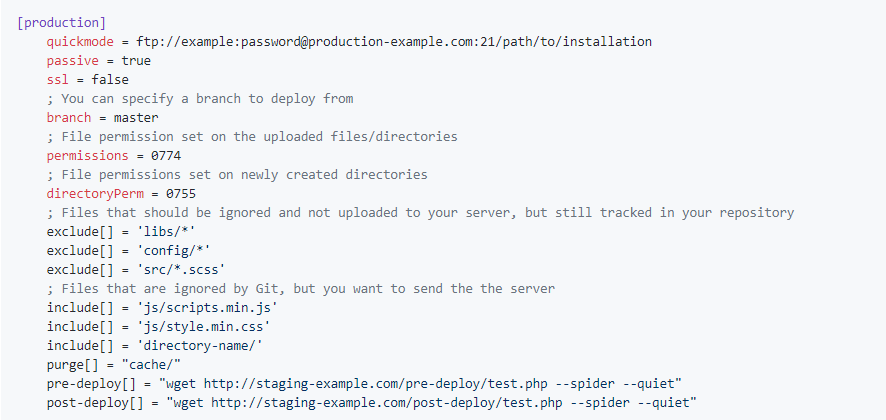
As you can see, there are basic include/exclude directives which you can set. Similarly to your .gitignore, you’ll want to include ignored files here; setting them in an include[] ensures those files are always uploaded. If you’re not one who likes providing the full source code, you can also exclude items here. Note, that the phploy.ini file is by default excluded from uploads.
Using PHPLoy also affords us the ability to manually roll back a server. Of course, if you’re worried about including login credentials in your repo, don’t. I’m going to show you a more secure method with Jenkins. For example, below is my trimmed down phploy.ini file. This is what we’ve used throughout time, your basic deploy setup to ensure theme files are deployed.

To install PHPLoy, it’s as simple as adding a composer.json to your project root which looks like so:

Jenkinsfile
This file is the guts of your entire build-system. The Jenkinsfile is the set of instructions to produce your compiled code, and it interfaces with many, many things to accomplish this task. Again, I’m not going to go in-depth on every aspect of the Jenkinsfile. For that, you can check out the syntax documentation. The Jenkinsfile is based on Groovy, yet another language in the development ecosystem.
In your Jenkinsfile, you’ll need four basic steps in order to comp e, and upload your changes. Admittedly, you can separate these into steps, instead of stages, and you could have a single stage to do everything! We’ve found it easier to group commands by type; thus, making it easier for just about anyone to read.
Checking Out Your Repo

The first, and most important step, is to check out the repository. To do that, the checkout scm step will suit you well. This process will check the revision to which you committed and begin the build/deploy process. Which is a great transition to our next step—compiling!
Compiling Your Repo
If you’re not using Grunt, Gulp, or some other form of compiler/transpiler, feel free to skip this step. That’s the beauty of separating each item into a group (stage). On some projects, you may not need to compile. Just pull and deploy.
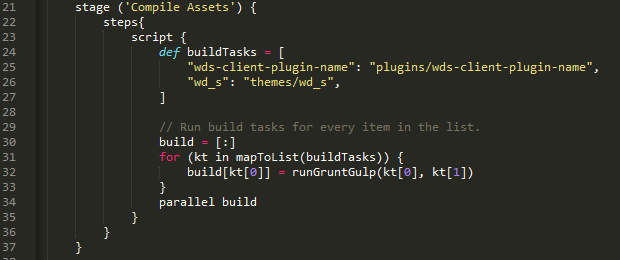
To compile multiple items in sequence, we built a loop to run over our compile commands. Note the runGruntGulp() function within the script on line 32.
This loop walks over the buildTasks variable created on line 24, which is an array of key/value pairs where the key is the display name shown to the Jenkins user, and the value is the path relative to the root of the repository.
The buildGruntGulp() function literally changes to the directory specified in the value and runs gulp or grunt if those files exist, nothing overly complicated. Granted, it is written in bash, but that’s a whole new article!
To be clear you do not have to use a loop like this; you can simply add your own steps and remove the script{} entirely. The benefit of running steps like this, however, is the parallell build call below, which allows us to run multiple builds simultaneously; thereby speeding up the compile process.
This builds EVERY branch! Why would you do that?
Depending on your implementation of Jenkins, this can provide feedback at the repository level. Github, for instance, will provide feedback on pull requests if the build fails, which will tell the user something happened during the build process and should be reviewed.
If building every branch isn’t your cup of tea, we’re getting into conditionals next, so be patient!
Deploying
As discussed earlier, for deployment – PHPLoy is my go-to for Jenkins when I need to get the code up to a client’s server. I’m sure it is not the only solution out there, but to be honest, after weeks of searching, I wasn’t able to find a DIY solution better.
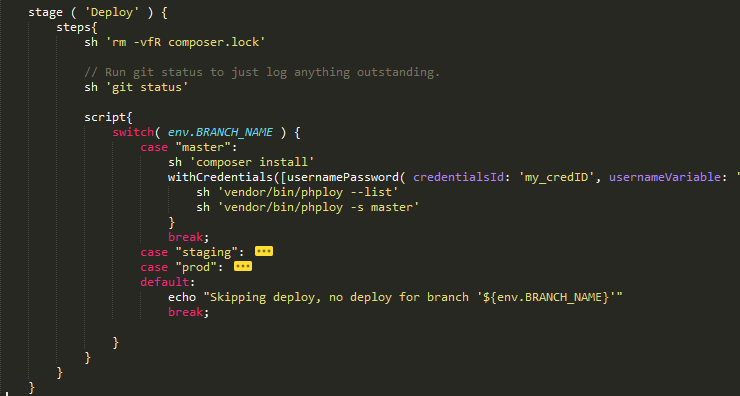
The deploy method I built uses 4-5 steps, depending on the branch; this is where conditionals come into play. Admittedly the composer.lock file is probably not needed, but I do like to log absolutely everything when making deploys. Considering PHPLoy will not deploy a file if it is tracked by GIT and modified during the build process. Instead of me scratching my head as to what changed, I’ve found running git status is an inexpensive win.
Next, we get into the scripted aspect of these deploys. We use a switch for env.BRANCH_NAME, an environment variable that is provided at the Jenkins level when a branch is checked out. So in this script block, I’m comparing the branch name to know rather or not to deploy it.
If you’re ever curious about what environment variables are available, you can add a step that prints them anywhere like so: sh ‘printenv’
If you’re familiar with switch statements you’ll notice the default key. Basically, if the branch is not staging, master, or prod, (case sensitive, I believe) then Jenkins will not kick off a deploy.
The first step for the master branch is composer install. Like you’d expect, this step is the setup for the deployments. It installs PHPLoy for you. Simple right?
Storing Credentials
PHPLoy utilizes global variables so you do not have to include username and password variables in your repository. To use this to our advantage, we need to use the withCredentials binding in Jenkins.
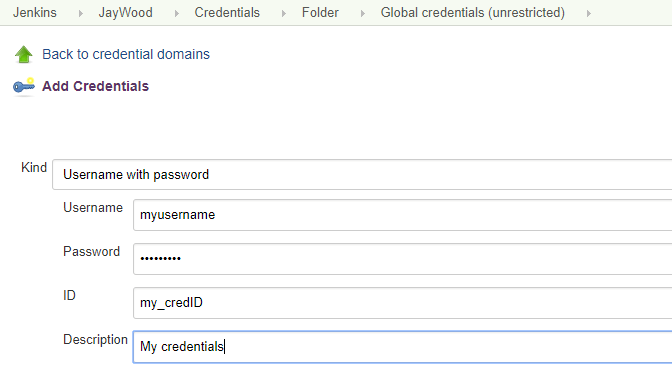
When you add credentials to a project, you just need to take note of the credential ID and make sure the credentialsID matches. Note the ID field will correspond to the ID in the Jenkinsfile.
Using the built-in Jenkins credentials storage will obscure your username and password from anyone viewing the logs. That’s about it for deploys. There are obviously more items in this deploy list, but they’re a bit more advanced, and I’m sure you’ve read a lot so far. So let’s get on to the final section, shall we?
Post Actions
After every build, you’ll want to be sure to clean up after yourself. There are also situations in which you may want to execute say a shell script to fire an email or integration on failure. This is where the post actions come into play.
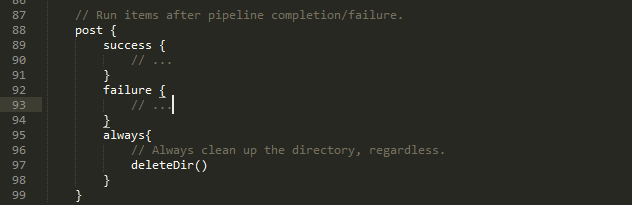
These directives are pretty self-explanatory:
- success – when the build succeeds
- failure – When the build fails
- always – Always run these commands
Jenkins pulls your files into a folder based on the project and branch. Due to this, you always have to run deleteDir(). Not to mention there’s a bug in PHPLoy which for some reason caches the files from the last commit/deploy.
I opened an issue regarding the bug here #324, but no movement. If you run into this and have a fix, do share!
Deleting the directory after build keeps your folders clean, and saves space on your server. The only issue I’ve noticed with this is due to the directory being completely removed. Cached build files (from npm install) are also gone, therefore making the build process longer than necessary. Though, I feel like that’s acceptable versus keeping the files around and using up space.
Final Steps
The final leg of the Jenkins journey is getting your GIT repo and Jenkins to talk to each other. For me, I use GitHub. Your usage may differ. Unfortunately, I know nothing else other than GitHub, so we’ll focus on that for now.
GitHub Integration
You’ll first need to go to GitHub and add the Jenkins github integration and input your URL.
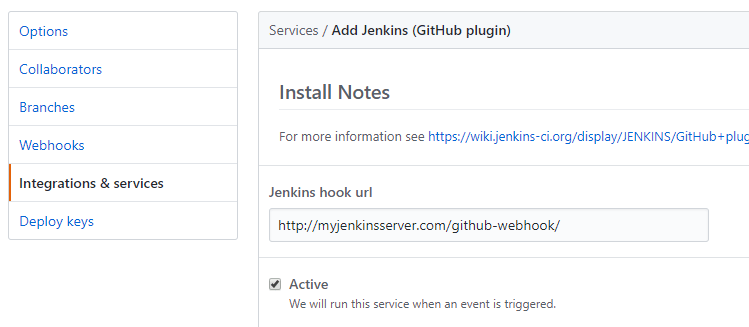
This, of course, assumes you have the GitHub plugin enabled on the Jenkins side of things, which if you installed using recommended settings, it will be. Once that’s ticked active, just save your settings and then go back to Jenkins.
Adding Your Project
For my pipeline management, I use Blue Ocean. You don’t have to, but I like the interface. So if you have a little Blue Ocean icon on the left, click it to go over to the dashboard, and click New Pipeline.

Select your GIT flavor, in this case, GitHub. You may have to enter some credentials here. It’s pretty simple. Just follow the on-screen instructions. This only happens once.
With your credentials set up, you should now be able to click New Pipeline and find the repo which has your Jenkinsfile.

Warning: I’ve found that the entire process will fire for EVERY branch in your repository. So if you don’t want deploys happening, you’ll want to make sure to comment out deploys on the initial build. The reason for this is on initial setup, Jenkins syncs its local database with the branches that exist on your repository.
Conclusion
If you’ve followed these steps up to this point, you should now have a full deployment solution. Once you’re ready, make a push to your server, and you should get a result something like the image below, which is a successful deploy.
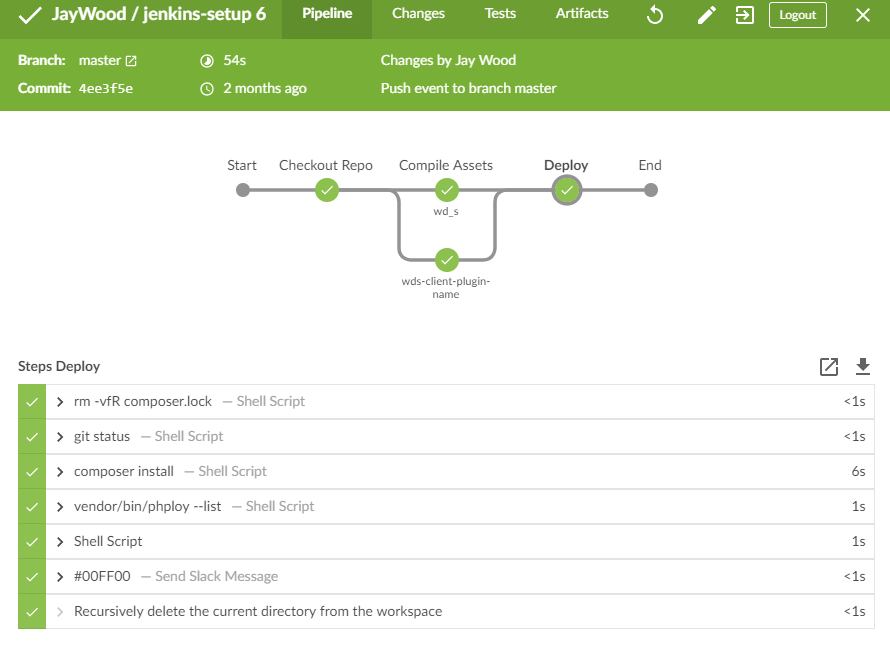
Pretty nifty, right? Notice my master deploy has a bit more commands than what’s included in the screenshots in this post. We’ll get to those in a later post as Slack integration could be a whole post in itself.
Keep in mind that it took me about a month to find the right solution for me. So, this article will not be the golden bullet for you. Do what works for you, but the most important advice I can give is to do your tests on a testing server and repo.
This setup works for the basic deploys and builds we need. Jenkins is super flexible and the sky is pretty much the limit when it comes to what it can do. You’re only limited by your drive to learn, and your imagination… and sometimes client budgets!
Overall, I hope this article gives you some insight into what you can do if you’re a DIY-er like me. If you would do it differently, or have a better way of doing it, do share your experiences in the comments below.