With version 5.8 of Advanced Custom Fields (ACF), a new way to build Gutenberg blocks was introduced. The mission statement of ACF with this pivotal update was to:
…radically change the perception of block development in Gutenberg by reducing learning time, hurdles, environment setup and JavaScript knowledge to an absolute minimum.
They have done exactly that.
For quite some time now, our wd_s starter theme has been powered in part by Advanced Custom Fields. Using the Flexible Content Field, we were able to create a page builder-esque experience for users. This experience lived on the backend when editing posts and pages. We didn’t set out to create a full-on page builder or content builder like the ones we’ve used in the past. We simply understood the need for users to have full control over their content, the placement of that content, and the overall structure of their posts and pages.
And it worked! It worked for a long time. In fact, it still works beautifully.
With the advent of WordPress 5.0, Gutenberg became the hot topic when discussing the CMS. Some absolutely loved the new experience while others reviled it for myriad reasons, such as it felt rushed, it wasn’t fully accessible, and that it was an oftentimes confusing experience.
For us, the issues we experienced working with and building alongside Gutenberg in its development was enough to raise a few red flags. Despite Gutenberg going live in 5.0, we stood back for a moment to evaluate everything before diving head-first into action with the new system. After all, what we had already established wasn’t broken. So, there was no need to “fix” it.
In order to keep our existing workflow in place, we enabled the Classic Editor plugin on new projects to disable Gutenberg and continue working with our tried and true ACF Flexible Content Block system. Once the ACF 5.8 betas and release candidates began rolling out with Gutenberg block support, we began testing the new features with our existing system.
What did we find? Well, to no surprise to anyone on the team, we found that it did exactly what it promised. We were able to spin up new Gutenberg blocks and begin planning a move away from Flexible Content and into a full-on Gutenberg experience.
First Steps
The first thing we needed to figure out when making the transition to ACF-powered Gutenberg Blocks was what we actually needed to include from our existing Flexible Content Blocks. Starting with a blank slate, our content blocks included things like a Call To Action, Hero, and Generic Content block which was a simple WYSIWYG field.
With the robust suite of blocks already available with Gutenberg, we knew we could trim down what we needed to bring over. So, we began to trim the excess and examine if the other blocks we needed served a larger purpose as custom blocks than by “replacing” them with core blocks. We were able to rip the Generic Content block out pretty easily as a standard content block can be added anywhere with Gutenberg.
For our other blocks, though, we found that there were enough little bits and bobbles attached to them that we didn’t want to give up. For instance, our blocks all include the same set of global options including the ability to set a background image, background video, or background color. With the video and image background options, we also include the ability to apply an overlay to make text easier to read when overlaid on the background.
We also have some bonus functionality like Start Date and End Date for those blocks you wish to only display for a specific period of time. Our Hero was also just a bit more fleshed out than what we felt we could accomplish with the core Gutenberg blocks, like setting the aforementioned background options, title, text, and optional link stylized as a button.
Our existing blocks also included Recent and Related Posts. While Gutenberg does offer a Latest Posts widget out of the box, there was just a bit more we were doing with ours that we didn’t want to give up. For instance, the core Latest Posts widget allows for you to specify a post category from which to draw posts but not post tags. You are also limited to selecting a single category or tag, while our block allows for selecting multiple terms in each taxonomy. Along with the previous global block options mentioned and some visual differences, we felt it important to include our own custom block.
Once we got through with our internal review process to determine which blocks we would port over, we were left with:
- Accordion
- Carousel
- Call To Action
- Fifty-Fifty
- Hero
- Recent Posts
- Related Posts
Creating Your First Block
The first step in creating your Advanced Custom Fields + Gutenberg block is to hook into acf/init and register your block. To ensure that your blocks all have the same global options, though, you’ll first want to establish your baseline supports features for the block:
With this, you’re saying two things: that you only want two layout options for your blocks and that you want to allow for your blocks to have an anchor, or ID, set. In general, the wd_s Flexible Content Blocks had conformed to the width of the content container with the option to go full-width, meaning they will span 100% of the browser width. This is common with blocks with backgrounds, especially heroes. Allowing for an anchor, or ID, was essential as this allows for users to link to other blocks either from the same page or externally.
Next, you’ll need to actually register your block:
This is the important stuff. You’re giving your block a name, description, some keywords, and enqueuing your scripts amongst setting some other baseline ACF settings. Once you have this in place, you simply need to hook in your function like so: add_action( 'acf/init', '_s_acf_init' )
Since you’re calling some other functions and functionality in your block registration, though, you also need to ensure you’re properly tapping into the groundwork Advanced Custom Fields has laid for you.
Adding a Category
In your block registration above, you’ve set your category as wds-blocks. However, that’s a custom category and doesn’t exist by default, which means Gutenberg won’t know how to find these new, fabulous blocks you’re building. Because of that, you need to register your category in a separate function:
Be sure your category slug matches the category name you’re prescribing exactly!
Registering Scripts and Styles
For the Accordion block, you’re calling the _s_acf_enqueue_accordion_scripts callback function to register the scripts necessary to power your block. In general, you may not need to register any scripts—just styles. For the Accordion and Carousel blocks coming form wd_s, though, there is some additional JavaScript needed to make sure the blocks work on the backend.
After all, if you’re looking to deliver a similar experience on the backend as you’re providing on the frontend, you want your JavaScript to work so users can see just how the Accordion collapses and expands before publishing their content. With that in mind, you have to enqueue your scripts:
Within this function, you’re also calling a function to enqueue styles, which looks like this:
You’ll notice the very first thing in both functions is the check for is_admin(). You don’t need to enqueue your scripts anywhere else than on the backend through these methods. The wd_s theme already compiles and enqueues all of the necessary JavaScript and CSS files for the frontend, and here you’re simply concerned with making sure those styles are reflected when adding a block in the editor.
Adding a Field Group
Once your code is in place, the next step is to create the fields for the block. After all, what you’ve done so far is just tell Advanced Custom Fields to create something called “Accordion,” but you’ve yet to actually put something in that block.
Just like with any other Field Group you’d want to create, you’ll navigate to the Custom Fields menu in the Dashboard and click “Add New.” Next, create the fields you need for your block:
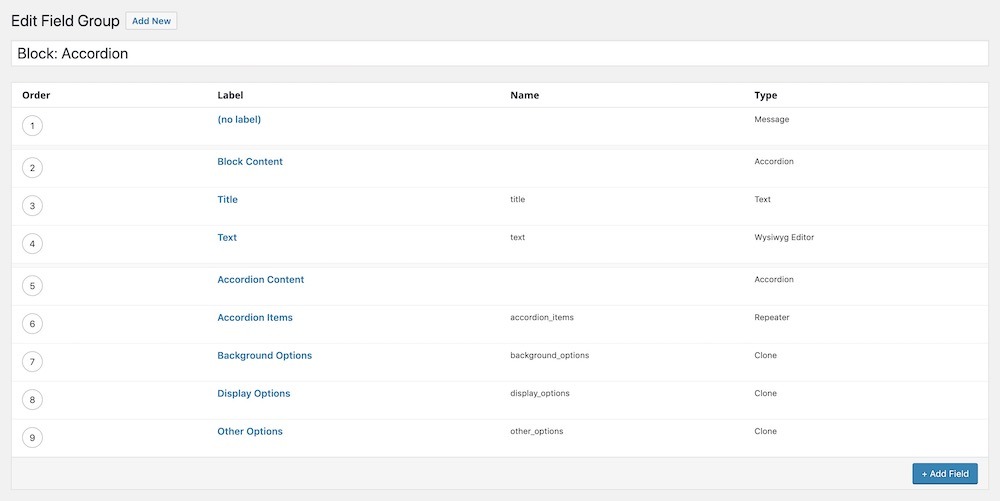
These will, of course, differ from block to block and for your own personal use cases. All in all, though, this should be familiar to anyone who has worked with ACF in the past. The next step is where things get changed up a bit.
With the previous Flexible Content Block system in wd_s, the “Active” option would be toggled to “Off” for all of the block Field Groups. Then, each block would be cloned in the actual Flexible Content Block Field Group. This helped keep things a bit more sane in the backend. Each block existed as a standalone Field Group, and other reusable Field Groups could be created and cloned into each block like the Background Options and Display Options.
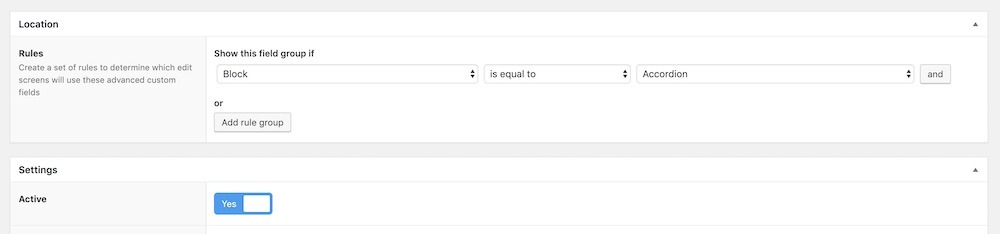
Now, however, you simply need to set your Location rules based on the block you’re creating. Since this is the Accordion block, you want to tell ACF to display these fields when the Block is equal to Accordion. Plus, you now need to ensure you set the Active option to “On” otherwise your block won’t display in the Gutenberg block selector:
And that’s how easy it is to create and register a block in ACF! You can now select your block from the block selector when editing your post… but nothing will happen.
Creating Block Templates
Before anything can actually display, you’ll need to create a template. Ain’t that just the way life works sometimes?
In the block registration way up above in this post, you may have noticed that we’ve set render_callback to _s_acf_block_registration_callback. This is where you’ll let Advanced Custom Fields know exactly where to find the template to display your block.
Keeping with the DRY mentality and not wanting to overload the theme with callbacks for every single block, wd_s includes a handy dandy function which will convert the block name to a slug and inject it into a core WordPress function to grab a template file. This function also checks to make sure the block isn’t expired, which is important because if your block is expired, you don’t want to display it on the frontend at all!
The end result is this tidy little 22-line chunk:
What lives in your actual template file is up to you and will change based on your block, but the important bits to mention are:
- Make sure you specify the correct template path
- Make sure you name your blocks and template files consistently
- In the case of wd_s, add an extra bonus for the Expired Block functionality
Since you have the ability to hide blocks after a specific date, you need a way to communicate this to users on both the frontend and backend. This is easy on the frontend. You simply don’t display the block at all. On the backend, though, you don’t want to hide the block completely because then a user can never edit it or even remove it. That block lives there now forever. It’s comfortable and can’t be evicted. It has attained squatter’s rights.
With a couple of little functions, and some CSS, you’re able to show editors that a block is expired while still allowing them to edit the block in the backend. This is super useful if a user has a block that runs once a week every month and you need to edit the content each month. Now, your users can place your block and let it sit quietly expired with your newest content updates until the new Start Date rolls around.
You’ll begin with this:
And build on that with the following pair of helper functions which check for a block’s expiration and add a class to the block if the block is no longer active:
Now when a block expires, your users will see a helpful notice in the backend:

Our Full Setup
After much back and forth in building, testing, building, testing, and reviewing we are super excited to announce that wd_s is now a Gutenberg-first theme! We merged in our pull request to convert all of our Flexible Content Blocks over to native Gutenberg blocks via ACF about a month ago and are looking forward to seeing how we can grow and expand the awesome functionality ACF provides.
There’s a lot going on here, so feel free to take a peek at our acf-gutenberg.php file to see how everything works together in the wd_s Github repo.
There, you can follow the breadcrumb trail to see some other magic we’re doing with our template files, template tags, and global block options like background elements. While there will always be improvements to be made, those will come in time as we use this new system more and more in real-world situations.
What have you built with the Advanced Custom Fields + Gutenberg integration and where can you see it going from here? Let us know in the comments below!