For many, the command line is a scary place where the only way to interact with your computer is to write a bunch of cryptic commands. This often leads us, as developers, especially newbie devs, to look for a better GUI-centric option. But GUIs can have their drawbacks, too. In my experience, I’ve found GUIs for using Git to be more confusing and more error-prone than using the command line. In this post, I’d like to walk through how to get started with the Git command line, and maybe even convince you to transition to the command line from a Git GUI.
Why bother with the Git command line?
So far, I’ve found my fondness for working with Git command line to be super useful. When I’ve been requested to help fellow developers with working with Git, the first question out of the gate is, “Do you use a GUI or the command line?” And when I say I use the command line, there is an instant sigh of relief. Why? Because the Git command line works consistently across platforms.
Just like every developer has their specific preference for one text editor or IDE over another, every dev has a Git GUI they prefer. Your Git GUI may not work on all platforms, and the way that GUI works may be very different from the one your colleague uses. However, the core set of Git commands used in the command line is always the same, and there is an extensive amount of documentation available, if you get stuck.
One reason I favor Git command line is that every action I take has some intention behind it, because I have to think through what I’m doing. If I want to stage files, I need might use git status to find out what is ready to stage, run git add -A or git add . to stage everything, and commit those by running git commit -m “Awesome commit message”. These very intentional thoughts and actions mean I won’t accidentally commit or push files that may break something for myself, or for others.
Making the transition
Have I convinced you to at consider least give the Git command line a try? Instead of deleting your Git GUI from your computer and forgetting about its existence completely, start small by using git for the basics: initializing repos, cloning, staging, committing, pulling, and pushing. Let’s walk through a workflow I might use to contribute to wd_s, our very own awesome WordPress starter theme. For this example, I’ve forked the starter theme, and will have it point to my remote, not wd_s’ repo.
- Clone wd_s to my machine
git clone https://github.com/carrieforde/wd_s.git wds - After making some changes, I need to stage them and commit them
git add -A
git commit -m “Add tangerine color variable" - Once I’ve made my changes locally, push them to my remote repo
git push origin master
Easy-peasy, right? I find the git add and git commit flow especially useful when I’m running gulp watch. It helps me ensure I kill the gulp watch task before I commit, and that files don’t continue to change after I’ve finished working on them.
Try using only the command line for these tasks for a week or two until you’ve got them committed to memory, and keep using your GUI for things like merges and managing conflicts. This will help build confidence and efficiency with Git commands before moving onto tackling slightly more challenging things.
Managing merges, diffing, and merge conflicts
I think merges are where things start to get “scary” for some folks, but because the Git command line requires those intentional thoughts and actions, merging is one of the things I always do over the command line. Much of the time, merges will go off without a hitch. Other times, you may have a conflict that simply rerunning gulp styles will fix. And then there are other times still where you and a colleague have been working on the same file on different branches, and when those branches are merged, chaos conflicts ensue. Let’s walk through a few of these examples.
Updating our fork of wd_s
When you fork something under active development, like wd_s, you’ll find that your version of the repo will need to be updated occasionally. You can easily reference the repo you’ve forked by adding an upstream remote. This way, you can pull and merge updates into your branch, and keep up with active development. Here’s how I might update my forked version of wd_s with a merge:
- Check the remotes, and add an upstream (a reference to our forked repo) if needed
git remote -v
git remote add upstream https://github.com/WebDevStudios/wd_s.git(if it wasn’t already present)
git remote -v(verify my remotes) - Fetch any upstream changes
git fetch upstream - Merge the upstream changes into my local branch
git merge upstream/master(You may replace master for any branch in the upstream repo, which is helpful when collaborating on features)
Alternatively, I could have use git pull upstream master if I didn’t want to create a commit. But because you can run into merge conflicts either way, it might make more sense to use a merge.
Luckily, that was a pretty straightforward update, but what should we do if the merge is a bit more complicated?
Diffing and managing merge conflicts
I learned recently that I can set a diff tool and launch it from the command line instead of launching a GUI. On Mac OS, the command line will try to launch File Merge as the default, which requires Xcode, but running git mergetool --tool-help will list all the available tools to run diffs. Ironically, Tower has a pretty good list of diff tools for MacOS X. For this example, however, I will use File Merge.
Let’s say that I have been testing the feature/pattern-library branch of wd_s (it’s rad and you should totally check it out), and I think it’s ready to merge into master of my local version of wd_s. Here’s how I would work through this:
- Check all my local branches and see which is the active branch
git branch - After confirming I’m on master, merge feature/pattern-library
git merge feature/pattern-library - Oh no, a merge conflict! Let’s diff the files with File Merge
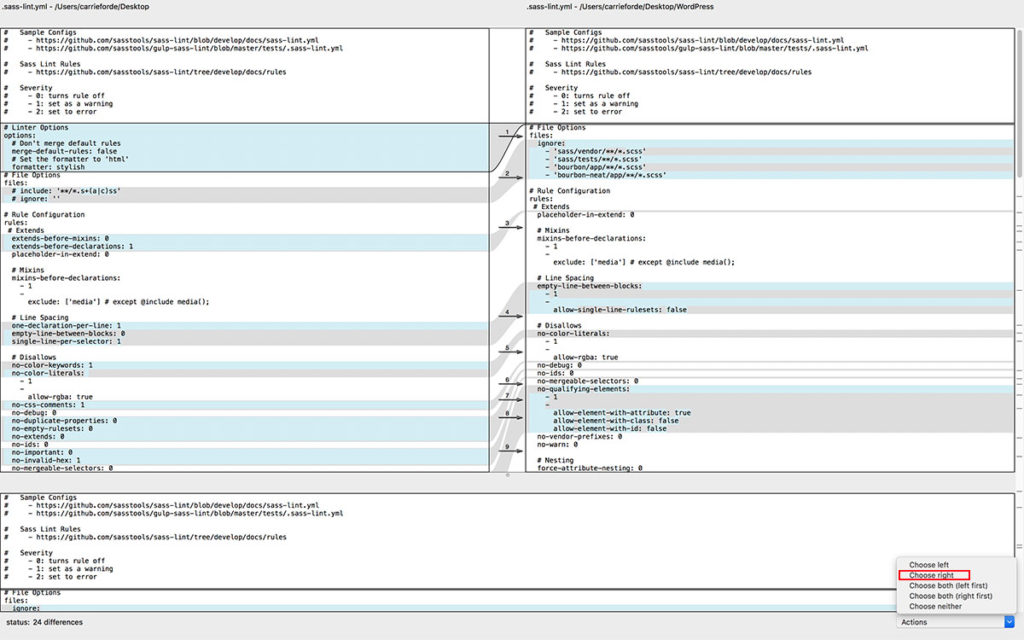
git mergetool - Review files in File Merge
The left side represents the local HEAD version of your file, while the right side represents the remote version you’re trying to merge. Use the Actions drop down near the bottom of the screen to decide how you’d like to manage the conflict, and then use File > Save or Cmd + S to save your changes. You’ll need to go back to your terminal to open the next file and review any additional conflicts. - Commit the changes
git commit -m "Resolve merge conflicts"
When things go wrong
I think we’ve all accidentally merged some things we shouldn’t have, or seemingly done damage to our local that is beyond repair. Or, is that just me? Resetting your local branch to your remote or upstream branch is actually really easy. In the last example, I merged the feature/pattern-library branch into master on my local, but I’ve since decided that I want to keep my local current with upstream (WDS’ version of wd_s). No problem; we can reset by running through the following steps:
- Fetch the WDS version of wd_s
git fetch upstream - Reset the local to match upstream
git reset --hard upstream/master
Yes, it is that easy. It only takes two steps to reset your local branch to match your remote!
A Git command cheatsheet
I hope I’ve convinced you that the command line isn’t a scary place after all. The best way to become more comfortable with the command line is to practice, and then practice some more. What are some of your favorite tips and tricks for working with the Git command line?