The goal of this article is to show you how to configure webpack to watch and compile the JavaScript files in a WordPress plugin. What this article will not cover is how to configure webpack to work with every file type known to the world. Our focus is going to be JavaScript. That’s it.
What is webpack?
According to the webpack website:
At its core, webpack is a static module bundler for modern JavaScript applications. When webpack processes your application, it internally builds a dependency graph which maps every module your project needs and generates one or more bundles.
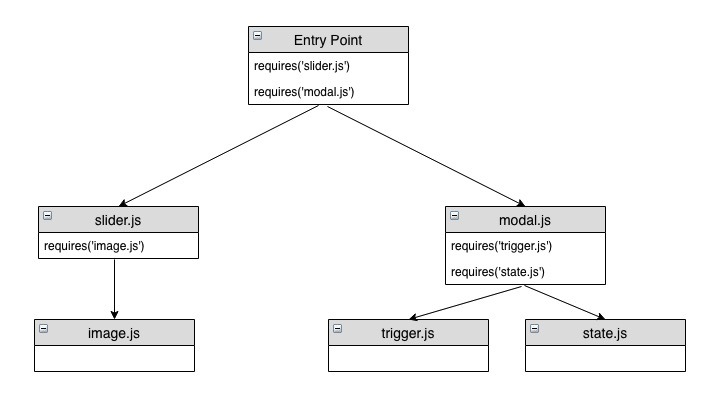
Now you might be asking yourself, what is a dependency graph? In webpack, there are files specified as entry points. These entry points are at the top of the dependency graph. Any files required or imported from the entry files will be processed and bundled by webpack.
Benefits
- Dependency Management – When concatenating JavaScript files for a WordPress plugin or theme, there is not an efficient way to add in third-party libraries. You can either download and enqueue the minified file or, worse yet, include it as part of the files being concatenating. With webpack in use, we get access to using a package manager like npm!
- ES6 – Webpack is able to transpile the ES6 code you write down to ES5 code making it compatible for older browsers.
- Code Structure – I think this is one of the biggest benefits of using webpack. Being able to structure our JavaScript code into modules helps to promote reuse and writing clean code. You will see examples of this in the code later in this blog post.
Webpack Basics
Below are brief explanations of four basic webpack concepts that I think are important when getting started.
Entry
The entry point specifies the location to the file that kicks everything off. It’s basically the starting point of your application.
There are several ways to declare entry points for webpack, but when building a config for a WordPress plugin, I typically like to have two entry points. One is for the admin area and one is for the frontend. By doing this, we can enqueue one compiled bundle for each location.
Output
The output specifies the location for the file or files that have been compiled and are ready for use. Just like the entry point, there are several ways to specify output files.
As I stated above, I prefer having two entry points: one for the backend and one for the frontend. This means we will need to also specify two output locations.
Loaders
Loaders are where a lot of the magic behind webpack happens. In basic terms, loaders have the ability to transform code you’ve written before it is imported or ‘loaded.’
An example of a loader would be the babel-loader which will transpile ES6 code down to ES5.
There are countless loaders out there to choose from. The webpack website has a nice list of some of the most used. You can find that list here.
Plugins
The last important concept I wanted to cover is plugins. You can think of these almost like a plugin you would use in WordPress. They basically add additional functionality to webpack.
For example, I like to use the progress bar webpack plugin which adds a simple progress bar during the build process. Find a nice list of popular webpack plugins here.
Now that you have a little bit of background on webpack and the concepts behind it, let’s get to building out a super-simple WordPress plugin that will use webpack to compile its JavaScript files.
Final Plugin Files
Just a quick heads up that a link to the finished plugin files is provided at the end of this tutorial in case you didn’t want to code along.
Step 1: Create a WordPress Plugin
For this WordPress plugin, we are going to keep things as simple as possible. Let’s not get distracted by the different ways to architect a plugin. We’ll keep it to just one file.
Create a folder inside the plugins folder called wp-webpack-example.
Inside the newly created folder, create a file called wp-webpack-example.php and add the code below to the file.
Feel free to customize the plugin information to your liking.
The code above will enqueue a different script for the admin area as well as the frontend. At this point, you should be able to check out the plugins page in the admin area and see the new plugin listed.
Go ahead and activate it! Not much will happen at this point since we haven’t actually created any of the files we are trying to enqueue.
Step 2: Create a package.json File
From a terminal window, change into the wp-webpack-example folder.
Run npm init and answer the questions you are prompted to answer. If you want to skip over those questions, you can run npm init --yes.
Now that we have a package.json setup, we can install some dependencies.
Step 3: Install Dependencies
First, let’s install webpack and the webpack-cli.
From a terminal, make sure you are in the wp-webpack-example folder and run the following command:
npm install --save-dev webpack webpack-cli
Next, let’s install a couple of Babel dependencies. These will transform ES6 down to ES5 so that it will be readable by older browsers as well as giving us access to some of the newer features of ES6.
From the terminal, run the following command:
npm install --save-dev babel-loader @babel/core @babel/cli @babel/preset-env
Finally, let’s install Lodash so you can see how to use a third-party library.
npm install --save-dev lodash
Step 4: Configuring Babel
Normally, I would create a .babelrc file and place the Babel configuration there, but in this case, since the configuration is so simple, we’ll just put it directly in the package.json we created earlier.
Add the Babel portion to the package.json file you created:
Step 5: Create the webpack Config File
Inside the wp-webpack-example folder, create a new file and name it webpack-config.js.
By default, webpack will look for a configuration file named webpack.config.js. I changed the name up for ours because embedding gists that have a . in the name does not work well.
Copy the annotated code from the embed below.
Step 6: Create the rest of the folder structure.
Create the additional files and folder needed to match the directory structure below:

Here are brief descriptions for each folder:
- assets/js: holds the compiled JS files
- src/: holds the source JS files
- src/admin: source files for the admin area
- src/front: source files for the frontend
- src/utils: source files for utility functions
You can think of admin/admin-index.js and front/front-index.js as being the entry points for their respective locations.
As a personal preference, I like to create a components folder that will hold all of the individual modules being used for each entry point. You can feel free to change up the directory structure to fit your needs.
Step 7: Add Test Code
Add the following code to utils-index.js. This file contains simple utility functions that we will share between the admin and frontend code.
Add the following code to the admin-test.js file. Here, we are requiring a single utility function upper and using it to uppercase admin logs.
Add the following code to the front-test.js file. Here, we are requiring both shared functions as well as importing the last function from lodash. Yeah, how cool is that? This is what I mean by easy dependency management.
The getLastArrayElement is just a wrapper function for the last function from lodash. It will return the last element of an array.
Add the following code to admin/admin-index.js.
Add the following code to front/front-index.js. Here, we are using that wrapper function getLastArrayElement that uses the last function from lodash.
Step 8: Create Scripts
Adjust the scripts portion of the package.json file to look like the one below. Notice how we are specifying the config file since we didn’t use the standard naming for it. These scripts can then be run from a terminal window.
The Plugin
Coding along with a tutorial can be tedious, so I’ve included a zip file with all the goods to get started with.
Just follow these simple steps:
- Download the plugin zip file here: wp-webpack-example
- Install it to your local WordPress installation
- In the terminal, change into the plugin folder
- Run
npm installto install the dependencies - Run
npm run watchto watch for file changes, or runnpm run buildto compile the changed files
Open the browser console and load up the homepage of your WordPress installation. You should see output like this:
![]()
Next, browse to the dashboard/admin area, you should see output like this:
![]()
Recap
We created a simple WordPress plugin that will enqueue a script file for the admin area and one for the frontend portion of the site.
We then created a simple webpack configuration that consists of two entry points and two output files. We also set up a loader that will transpile down our ES6 into ES5 so it is readable on older browsers.
Finally, we created two scripts in the package.json file. One will watch for file changes and the other will build files.
I would really like to encourage developers to think about how they can start using modern JavaScript techniques in their WordPress plugins. It’s just as much about how you structure the JavaScript as it is writing it.
this is overwhelming for me, I am searching to minimize the CSS and js but style your code works on my pc and don’t know what to do ahead.
Can you use this inside of a WordPress theme for compiling and minifying the js and scss into css? Would the file structure be the same except you put it all inside of a theme folder?
Thank you!
Clear and simple, thank you so much.
Use gulp then, its more easy to understand and easy to use because all in one file
here is example: https://github.com/qant/playground/blob/master/25/gulpfile-esm.js
This was so helpful. Thank you!