Author’s Note: The following guide revolves around UNIX systems.
You are about to read a story of how I saved myself from eight mouse clicks.
TL;DR
- Install ImageMagick CLI
- Add the above function to a file called
.custom_commands.shin your home directory. - Add this to your
.bashrc->source ~/.custom_commands.sh - In the directory full of .jpgs you’d like to convert, run in the terminal:
ctwp jpg - You now have copies of your .jpgs in optimized .webp format!
The Longer Route
The scenario:
You are making a grid of cards. They look amazing. The pictures are beautiful, Lighthouse is happy, and nothing could be better.
The situation:
There are four new images that just need to be added to a static folder shipped with the frontend. The assets provided are 4000px X 6000px. And they’re jpegs. And they’re 5 MBs. Lighthouse plummets. The website now takes eight seconds to load.
The solution:
Not a problem, there are plenty of websites such as Squoosh, or programs such as Photoshop, Krita, or Image Magick who could handle the compression of these images for you with a few mouse clicks.
The holdup:
If you’re anything like me, you absolutely hate using your mouse. Half the time a cat is laying on it anyways. Also, it’s repetitive. You don’t want to have to do that for four different images. That could literally take almost three minutes.
The new solution:
You write a shell script to do it for you. Why spend three minutes when you can spend half an hour making sure you never have to spend those three minutes again. Isn’t that what programming is?
The staging:
Four images
- bull.jpg; 5.3 MB; 5179 x 7200
- guitar.jpg; 4.1 MB; 4897 x 6121
- horses.jpg; 2.4 MB; 4016 x 6016
- inside.jpg; 4.1 MB; 4000 x 6000
The regulations
- The images are lined up in a grid, with a max-height of 600px.
The first steps
- Resize the images to only be as big as you need.
- Convert to .webp format.
After that, we’ll make it difficult by adding more, unnecessary steps.
Step 0 – Setting Up
As mentioned before, there are plenty of ways to resize this photo online and using a GUI. But, we’re not going to do that.
Instead, we are going to use ImageMagick CLI. The easiest way to do this is through the command line.
To install ImageMagick, regardless of your OS, just follow the website’s instructions.
Step 1 – Resizing
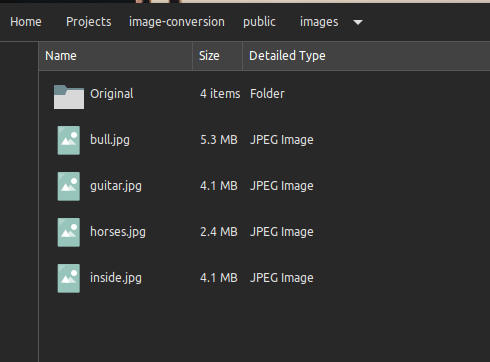
Ok, now ImageMagick is installed (if it wasn’t already), and so we are going to open up our terminal and `cd` into the directory. Inside this test directory, I have just the four images (and a backup folder of the originals).

Let’s check the first image using ImageMagick’s identify command:
Yikes. 5.3MB, JPEG, and 5179 X 7200? We do need that to change.
Luckily for us, it can be done with just one command with ImageMagick CLI installed!
As mentioned above, we need just 600px in height. Using the ImageMagick CLI, you can easily resize images using the -resize flag, and giving it {w}x{h}. Since we do not exactly know the width, and only want to provide the height, we can just use x{h}, like so:
convert bull.jpg -resize x600 bull-resized.jpg
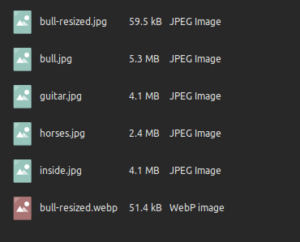
And looking in our directory… we now see that there is a resized copy of the bull.jpg, called bull-resized.jpg.
![]()
Now, let’s look at the specs, again using ImageMagick:
Perfect! It resized it to a height of 600, adjusted for the width, kept the quality, and already reduced the file size to 59.5 KB (from 5.3MB).
Now, we could do this command for every image. But again, I am trying to shave precious seconds and mouse clicks off my day. So if you are too, I suggest you move on to the next step.
Step 2- Compressing
What is .webp? It’s a ‘next-gen’ format given to us by Google that severely reduces file size. It does a great job of compression. And that’s what we need, so we are going to use it.
And again, we are going to use ImageMagick’s CLI.
In the directory’s terminal, use:
convert bull-resized.jpg bull-resized.webp
And now we have a .webp image. Super simple.
How much does it reduce our load? It’s not as much as the resize, but enough. We are now down to 51.4KB.
Was the extra step worth it for 8KB? Yes.
Step 3 – And now we know everything
And that’s it!
No, just kidding. Now, we’re going to shave even more seconds off our day. So, we’re going to write a custom shell command to iterate through this directory and convert all the images to .webp and resize them to fit in the grid with one, reusable line.
To sum up all we know:
- ImageMagick can resize an image based on width, height, or both.
- ImageMagick can convert jpegs, PNGs, and more to .webp for us.
And the requirements to solve our problem:
- The pictures need to be 600px tall.
- We would like to use .webp.
As you may have already derived, we could easily convert and resize the images in one command using ImageMagick:
convert bull.jpg -resize x600 bull-optimized.webp
Perfect! Now we can do that for every image. I’m kidding again. But, we are going to take this an unnecessary step further.
Step 4: Writing a custom command
We’re going to make a new file in our computer’s home directory: .custom_commands.sh.
Then, in our .bashrc, we are going to add this line (I added it below my aliases, but honestly anywhere is fine):
source ~/.custom_commands.sh
Once we restart (or restart bash), this is going to give us access to any functions we place inside .custom_commands.sh.
Now, inside .custom_commands.sh we are going to write a function called ctwp() (“Convert to weppy,” I whisper to myself every time I type it).
This allows us to:
- Provide the extension we would like to convert.
- Dynamically create new, optimized .webp files of all the images in the directory under the extension you provide.
In action:
(For clarification I have changed `public/images` back to just the four images.)
![]()
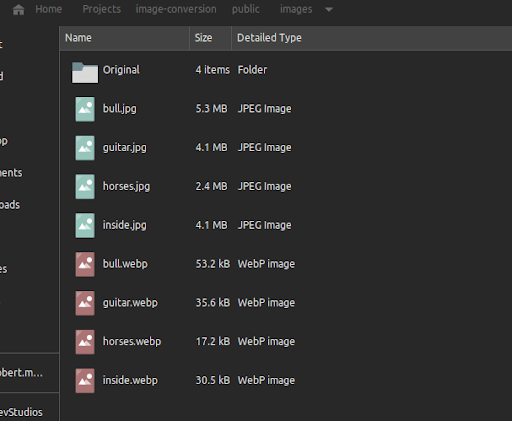
And now we are going to run our custom command via the terminal. To keep it simple, we are going to just convert everything with the extension .jpg to .webp, using ctwp jpg.
That makes a copy of everything with the file extension of .jpg, converted to .webp!

But that’s not exactly what we wanted. We also want to be able to resize images on the fly.
So, we’re going to make a small adjustment to our custom function.
This allows us to add any additional parameters from ImageMagick that we would like applied to the images. For me, the most commonly used flag is -resize, but you can find the entire list of parameters available to optionally add at ImageMagick.org.
Now, let’s see it in action.
Before…
Run the command, ctwp jpg '-resize x600' . Make sure that second argument is in a string, otherwise it will see it as multiple arguments.
And after!
There we go, using just one line we were able to resize the card images to exactly the height we’d need, while converting them to a more optimized format and severely reducing the size of our assets.
Wrapping Up
Now that you have a .custom_commands.sh on your system, put it to good use. As with all programming, the possibilities are endless. I regularly use functions ranging from a mktest() function, that creates an empty $1.test.js file for me, to more robust createDirectory() functions with a specified language to create entire components, classes, functions, or CSS module scaffolding for me.
Necessary? Not at all! But I do have fun doing it.
Comments