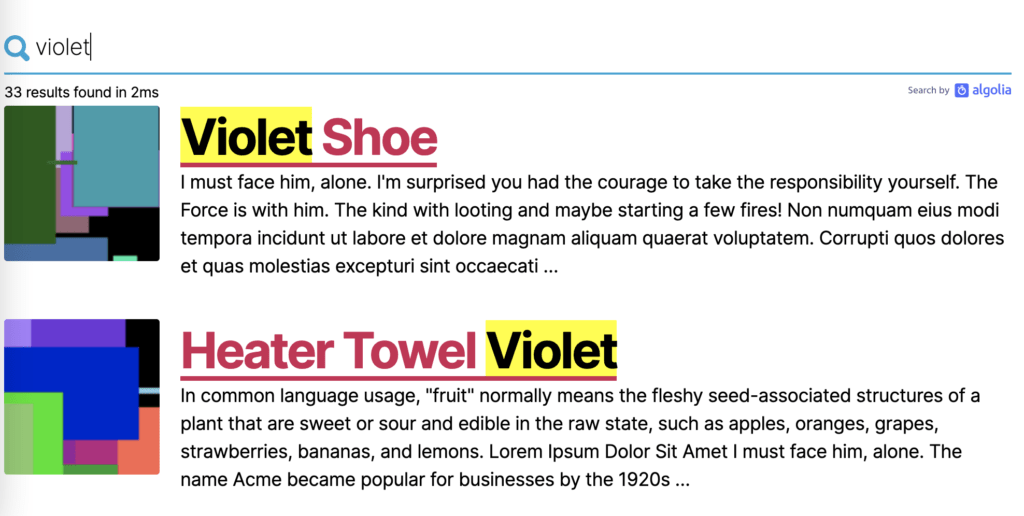
In the first part of my three-part series, Integrating WP Search with Algolia, I covered settings and index management for a WordPress install. There, I shared details like managing indices settings, as well as controlling when products may or may not get indexed alongside what product data is included.
I also covered the results to be shown for both autocomplete suggestions and instant search, among some other elements. It’s worth reading if you haven’t yet.
Today, however, we are going to focus on template customization for WooCommerce. Specifically, I am referring to the display of your Algolia data on your WordPress website and how to customize the display of returned results.
We will be using the product data discussed in part one of this series.
WP Search with Algolia: Autocomplete and Instantsearch Template Files
When you download WP Search with Algolia, it comes with a couple of template files for both autocomplete and instantsearch. These make for solid defaults with minimal display, but we need to make them more robust and fit our needs.
In order to customize these files safely, we need to copy the autocomplete.php and instantsearch.php files out of /plugins/wp-search-with-algolia/templates/ and into a folder named algolia in your currently active theme.
The plugin will automatically detect their existence from the theme and use those copies instead of the prepackaged versions. This allows you to customize and still update the plugin without losing customization.
Autocomplete
Below is a screenshot of the default autocomplete search when using the TwentyTwenty theme. Here, we can see a heading mentioning the content types being shown, followed by five different products matching our search term.
Each result includes a thumbnail for their product image, product name, and product description.
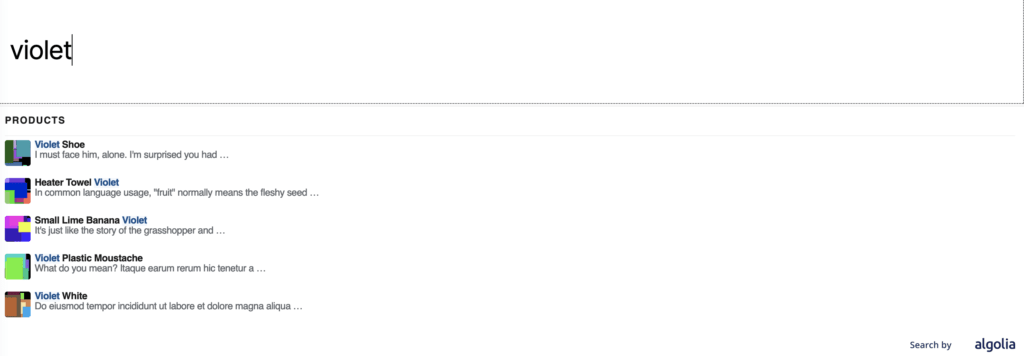
We are going to change the listings to include both the price and SKU number next to the product name, and use the short description if available, or else the current description.
For this, we need to edit the autocomplete.php template file, specifically, the section found at Autocomplete.php line 21-33.
Here, we will have a JavaScript variable data that will hold information for each suggestion hit, meaning an individual product. Now, we start making use of all that information we indexed.
The bundled template files make use of the wp.template functionality that ships with WordPress. It uses underscore.js for its templating, and has a mustache-like syntax. Luke Woodward has a great general tutorial for making use of this on your own.
<div class="suggestion-post-attributes">
	<span class="suggestion-post-title">{{{ data._highlightResult.post_title.value }}} - {{ data.sku }} - {{ data.price }}</span>
	<# if ( data.short_desc ) { #>
		<span class="suggestion-post-content">{{ data.short_desc }}</span>
	<# } else if ( data._snippetResult['content'] ) { #>
		<span class="suggestion-post-content">{{{ data._snippetResult['content'].value }}}</span>
	<# } #>
</div>
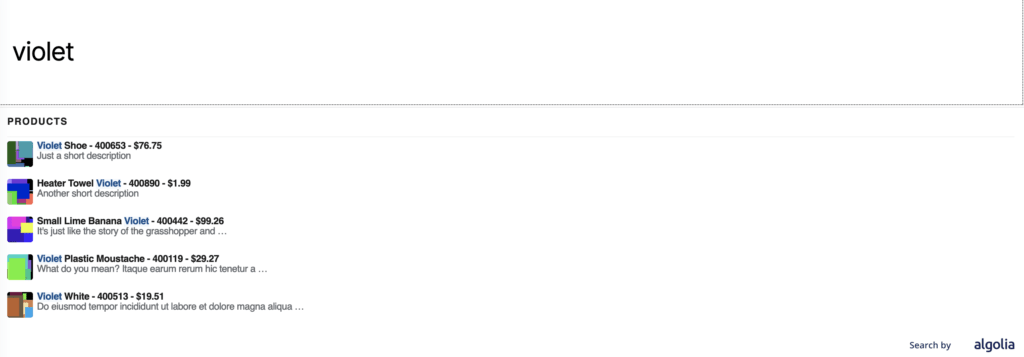
In the snippet above, I have amended the markup for the “suggestion-post-attributes” wrapper div, starting on line 26, to include a few more things. These values are all on the top level of your product index when looking at the item in the Algolia dashboard.
First, we output the SKU property, followed by the price property. Both are included in the span wrapping of the original post title value, which is getting some extra highlighting from Algolia.
Next, we can use some standard “if statement” logic on the properties to check if we have a value before acting. Here, I have checked to see if we have a short description to show, otherwise it falls back to the original snippet version coming from the full product description.
Below is a screenshot of the final result.
Other areas of the autocomplete.php template file has spots for customizing details like the autocomplete header, term suggestions, user suggestions, autocomplete footer, and no results template. We are not going to worry about those at the moment.
Towards the very bottom is the JavaScript that is powering everything. For the sake of this post, I won’t be going into details there. What we’ve been concerned about is the display of data coming back from a given query.
Instantsearch
Now that we’ve added some content to the autocomplete suggestions, we will add the same information to our Algolia hits output before we click into a specific result.
For this portion, we need to edit the instantsearch.php template file.
The section for this one can be found at Instantsearch.php line 48-68. We are going to insert a new paragraph tag above the excerpt, to conditionally show both the SKU and the current price if we have a value.
<h2><a class="ais-hits--title-link" title="{{ data.post_title }}" href="{{ data.permalink }}">{{{ data._highlightResult.post_title.value }}}</a></h2>
<# if ( data.sku || data.price ) { #>
	<# if ( data.sku ) { #>
		<span class="is-hit-sku">SKU: {{data.sku}}</span> |
	<# } #>

	<# if ( data.price ) { #>
		<span class="is-hit-price">Price: {{data.price}}</span>
	<# } #>
<# } #>

<# if ( data.taxonomies.product_cat ) { #>
	{{{data.taxonomies.product_cat}}}
<# } #>
<div class="excerpt">
To help keep our markup clean, we are only going to output anything if we have either a SKU or a price value. Once we know we have something, we output some span markup for each data item we have.
For easier styling, we have included some custom classes. To top off our instantsearch customizations, we’re going to output the product category for each.

Template Summary
These template edit examples are definitely minor but show how to take a given Algolia hit and modify the output for each. The data object variable is going to be the key here.
As a reminder, when viewing your index in the Algolia Dashboard and index explorer, each part of a given object is available via that data variable. Some parts may be top level like data.post_title, while others may be a bit more nested like you see in the images. For example, data.images.thumbnail found in use in the template files, but not as part of our code examples above.
Our journey through integrating WP Search with Algolia is not complete. Coming up next in this series, I’ll discuss facet widget customization. Be sure to come back to this blog.
Thanks for the information, is working great on our ecommerce site, 1 issue I found was with [code]
{{{data.taxonomies.product_cat}}}
[/code]
This would list all categories the returned product was in, which on some of them are in excess of 50, so looks unsightly.
As a temporary solution I simply removed the code from the instantsearch.js and will look to return the primary category (as defined by Yoast SEO) but this needs some dev work!
Definitely could be the case and awesome feedback. I could see potentially wanting to limit how many categories get indexed, in the event of having many, or maybe just pushing SEO-optimized ones only, but that also turns into customizations elsewhere.