Welcome to the final part of our tutorial series focused on integrating Algolia search with a WooCommerce store. To do this, use the WebDevStudios-developed WordPress plugin, WP Search with Algolia. Today’s blog post focuses on WP Search with Algolia InstantSearch widget and facet customization.
Previously, this series covered WP Search with Algolia settings and index management (Part 1) and template customization (Part 2). If you haven’t read either, it’s worth going back to them since today’s blog post builds on the code provided in those.
Let’s begin.
Facet(s) configuration
Algolia comes with many useful widgets and facets for integrating InstantSearch with your business or website, allowing you to create robust UI for your users. Find quick demos of all of them over at their Algolia Showcase.
By default, WP Search with Algolia (WPSwA) makes use of the following widgets:
- Searchbox: The user types in a query
- Stats: General statistics regarding the current query
- Hits: The results for the current query
- Pagination: Navigation to move through any paged results
- Menu: General list menu
- Hierarchical menu: Menu that will nest items based on parent/child hierarchy
- Refinement list: List of content types that can further refine results
- poweredBy: A touch of branding when applicable
You could also add some extra useful widgets like a “sort by” dropdown, a “clear all” toggle to clear currently applied refinements, numeric menus, range inputs or sliders if you have some number-based attributes, a rating menu, and various other types. There is plenty to work with to fit your needs.
For the purposes of our integration with WooCommerce, we will focus primarily on the refinement list widget for finding just the products we want.
One of the WooCommerce attribute types I have in my demo site is “color.” This has resulted in a product attribute of pa_color and right now it has three terms in it.
To get this added as a widget we can further refine results with, we need to get some markup in our instantsearch.php file to render the widget. To start, we will add this below the Users section of the sidebar area. For our example, we’re using facet-color for our ID which we will need in a moment. You can use whatever ID value you want though.
<div>
	<h3 class="widgettitle"><?php esc_html_e( 'Users', 'wp-search-with-algolia' ); ?></h3>
	<section class="ais-facets" id="facet-users"></section>
</div>
<div>
	<h3 class="widgettitle"><?php esc_html_e( 'Color', 'wp-search-with-algolia' ); ?></h3>
	<section class="ais-facets" id="facet-color"></section>
</div>
Next, we need to configure the widget itself. This will go in the search.addWidgets([ ... ]) block of our template file.
search.addWidgets([

	...
	/* Search powered-by widget */
	instantsearch.widgets.poweredBy({
		container: '#algolia-powered-by'
	}),

	instantsearch.widgets.refinementList({
		container : '#facet-color',
		attribute : 'taxonomies.pa_color',
		operator  : 'or',
		limit     : 5,
		sortBy    : ['isRefined:desc', 'count:desc', 'name:asc'],
		showMore  : true,
	}),
]);
Here we will need the ID that you used with the widget above. We want to specify it in the container property, so that Algolia can find the div and render the refinement list widget.
Next, we need to tell the widget which indexed attribute we want to reference here. That is where taxonomies.pa_color comes in. Specifying this attribute informs Algolia to fetch all the indexed terms from the pa_color attribute, that match the determined results for a given search.
By default, WPSwA will include WooCommerce’s product_cat, product_tag, and various created attributes assigned to your products, so these should be available as soon as you index the product WooCommerce post type.
The operator property can be used to indicate which attributes should be associated with an item to be listed when refining. In this case, we use “or” to say “the product must have this attribute OR this attribute,” meaning any of the checked attributes.
If you set this value to “and,” then it turns to “the product must have this attribute AND this attribute” to be shown, meaning all of the checked attributes.
The sortBy tells in which order the refinement list items should be listed. By default, WPSwA puts “isRefined” items first, which would be if an item is checked, that item moves to the top of the list.
Next, it orders them by item with the most results available first, and then any with matching amounts shown alphabetically. Toy around with the sort order and see which display type you prefer most.
Lastly is the limit and showMore properties. If you specify a limit without showMore or showMore set to false, then Algolia will only return the amount specified by limit.
However, if you set showMore to be true, then the limit will be how many it shows before offering a button to select to show the rest of the found attribute items. You can read about all the refinementList properties in the refinementList documentation.
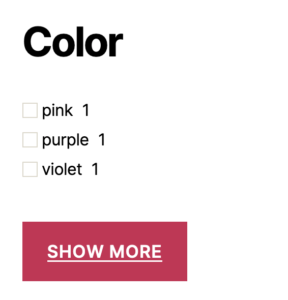
With these settings in place for the widget, we should see something like this below.
Most of the default widget sections in the WPSwA template and instantsearch.php don’t make sense for our purposes. You can keep them if you want, but I’m going to remove them for the rest of this article.
This will result in our facets <aside> looking like this below (about lines 27 through 32), ready for more additions as needed for widgets that make sense.
<aside id="ais-facets">
	<div>
		<h3 class="widgettitle"><?php esc_html_e( 'Color', 'wp-search-with-algolia' ); ?></h3>
		<section class="ais-facets" id="facet-color"></section>
	</div>
</aside>
This will also result in a reduction of our search.addWidgets([ ... ]) section as below. I have concatenated some parts within longer widget sections for brevity.
search.addWidgets([
	/* Search box widget */
	instantsearch.widgets.searchBox({
		container: '#algolia-search-box',
		placeholder: 'Search for...',
		showReset: false,
		showSubmit: false,
		showLoadingIndicator: false,
	}),

	/* Stats widget */
	instantsearch.widgets.stats({
		container: '#algolia-stats'
	}),

	/* Hits widget */
	instantsearch.widgets.hits({
		container: '#algolia-hits',
		hitsPerPage: 10,
		templates: {
			empty: 'No results were found for "<strong>{{query}}</strong>".',
			item: wp.template('instantsearch-hit')
		},
		transformData: {
			item: function (hit) {
				...
			}
		}
	}),

	/* Pagination widget */
	instantsearch.widgets.pagination({
		container: '#algolia-pagination'
	}),

	/* Search powered-by widget */
	instantsearch.widgets.poweredBy({
		container: '#algolia-powered-by'
	}),

	instantsearch.widgets.refinementList({
		container : '#facet-color',
		attribute : 'taxonomies.pa_color',
		operator  : 'or',
		limit     : 5,
		sortBy    : ['isRefined:desc', 'count:desc', 'name:asc'],
		showMore  : true,
	}),
]);
You can add as few or as many extra widgets as you want to be based on the needs of your store. Just make sure to remember to create the container markup so that Algolia can render the widget, and accurately specify the attribute to use for the given facet.
For a quick extra attribute demo, I’m going to add one more named “Size,” using the same steps above, resulting in these two additions. This time though, I have changed the sortBy to have just “isRefined” first, followed by the name in ascending order. I have removed the sort by count.
<aside id="ais-facets">
	<div>
		<h3 class="widgettitle"><?php esc_html_e( 'Color', 'wp-search-with-algolia' ); ?></h3>
		<section class="ais-facets" id="facet-color"></section>
	</div>

	<div>
		<h3 class="widgettitle"><?php esc_html_e( 'Size', 'wp-search-with-algolia' ); ?></h3>
		<section class="ais-facets" id="facet-size"></section>
	</div>
</aside>
instantsearch.widgets.refinementList({
	container : '#facet-color',
	attribute : 'taxonomies.pa_color',
	operator  : 'or',
	limit     : 5,
	sortBy    : ['isRefined:desc', 'count:desc', 'name:asc'],
	showMore  : true,
}),

instantsearch.widgets.refinementList({
	container: '#facet-size',
	attribute: 'taxonomies.pa_size',
	operator : 'or',
	limit    : 5,
	sortBy   : ['isRefined:desc', 'name:asc'],
	showMore : true,
}),
Replacing Shop and Product Category Archives with Algolia
This section of this tutorial on WP Search with Algolia InstantSearch widget and facet customization may be our greatest trick! Ready?
We are going to replace both the shop page as well as product category archives, i.e. /product-category/inflatable-toys/, with our overall Algolia Instantsearch UI.
With the shop landing page, we will present everything as if no specific query has been made yet, while with the product category archive will be limited to the products that would be originally listed there.
Loading Necessary Scripts and Styles
To accomplish this, we must first create a couple of template files and also enqueue some assets. First, we will get our assets loaded. This will help make sure we have the scripts and styles needed.
function woo_product_cat_algolia_assets() {
	if ( ! is_product_category() && ! is_shop() ) {
		return;
	}

	wp_enqueue_script( 'algolia-instantsearch' );
	wp_enqueue_style( 'algolia-autocomplete' );
	wp_enqueue_style( 'algolia-instantsearch' );
}
add_action( 'wp_enqueue_scripts', 'woo_product_cat_algolia_assets' );
Here we’re checking if we’re on a product category or the shop page, and if not, just return early. If we are, then we enqueue our InstantSearch JavaScript and CSS, as well as our autocomplete CSS.
Template Overrides
Next, we need to create the following files in our theme:
- archive-product.php
- taxonomy-product-cat.php
Since these file names follow the WordPress template hierarchy, they can be dropped directly into the theme folder.
For my example, they will be twentytwenty/archive-product.php and twentytwenty/taxonomy-product-cat.php. Inside both files, we just need to load our instantsearch.php file instead of what would be loaded by WooCommerce.
Below should be the complete template files needed to work for both.
<?php

if ( ! defined( 'ABSPATH' ) ) {
	exit; // Exit if accessed directly.
}

require_once Algolia_Template_Utils::locate_template( 'instantsearch.php' );
If all went well, then visiting your shop landing page and any product category should now be showing Algolia-based listings.
Product category customization.
Before we can call ourselves done, we need to configure the product categories just a little bit. We want these to be limited to just products within that category.
To accomplish this part, we need to get some WordPress query details added to our inline scripts. We are going to add to our woo_product_cat_algolia_assets callback function and determine the current product category.
function woo_product_cat_algolia_assets() {
	if ( ! is_product_category() && ! is_shop() ) {
		return;
	}

	wp_enqueue_script( 'algolia-instantsearch' );
	wp_enqueue_style( 'algolia-autocomplete' );
	wp_enqueue_style( 'algolia-instantsearch' );

	global $wp_query;

	if ( empty( $wp_query->query['product_cat'] ) ) {
		return;
	}

	$term_parts = explode( '/', $wp_query->query['product_cat'] );
	$results['terms'] = [];
	foreach( $term_parts as $part ) {
		$term = get_term_by( 'slug', $part, 'product_cat' );
		$results['terms'][] = $term->name;
	}
	wp_add_inline_script( 'algolia-instantsearch', 'const woo_algolia_queried_terms = '' . json_encode( $results ) . ''; ' );
}
add_action( 'wp_enqueue_scripts', 'woo_product_cat_algolia_assets' );
With this added code, we are grabbing the current global $wp_query object and using PHP’s explode function on the product_cat portion of the query arguments.
This will get us an array of product categories for the current query. We then iterate over those categories and get term objects for each, before storing the term name values as part of our $results array.
Finally, we store that $results variable as JSON on a JavaScript constant to be used in a moment. This way we can access the product category information in our InstantSearch configuration code.
Back in our instantsearch.php file, we need to add this alongside our widgets configuration. We are grabbing that available woo_algolia_queried_terms constant that we just created, and parsing it as JSON data.
Once we have the identified terms from the current query, we add it to the Algolia configured widget and specify it as a default for the filters. This way it’s only showing items from the chosen category.
<?php if ( is_product_category() ) { ?>
	let woo_term_data = JSON.parse( woo_algolia_queried_terms );
	let item_parts = [];
	for (const item of woo_term_data.terms) {
		item_parts.push('taxonomies.product_cat:"' + item + '"');
	}

	let woo_query = item_parts.join(' AND ');
	search.addWidgets([
		instantsearch.widgets.configure({
			filters: woo_query,
		}),
	]);
<?php } ?>
You can read more about the configure widget over at Algolia Configure widget documentation.
Conclusion
This completes this tutorial on WP Search with Algolia InstantSearch widget and facet customization. We’ve covered a lot over these past few posts.
Hopefully, these tutorials give you a good idea of what is capable with WP Search with Algolia and WooCommerce, out of the box and with a touch of configuration and customization.
This is definitely not the end-all-be-all of the capabilities, and there is plenty of room for more. It’s all a matter of what data you put in your Algolia indexes, and how you want to make use of it.
When you need a team to integrate the power of Algolia search with your WordPress website, contact WebDevStudios.
Complete Code
As promised, below you can download a zip file that has the final code for our WP Search with Algolia InstantSearch widget and facet customizations, as well as all the topics covered in the previous posts. These are ready to install as a plugin.
You will need to copy the two template files into your active theme and place them in a folder named “algolia” for those to be detected. The rest of the code will work as a plugin named “WooCommerce Algolia.”